Technical Insights: Azure, .NET, Dynamics 365 & EV Charging Architecture

Category: Uncategorized Page 1 of 4

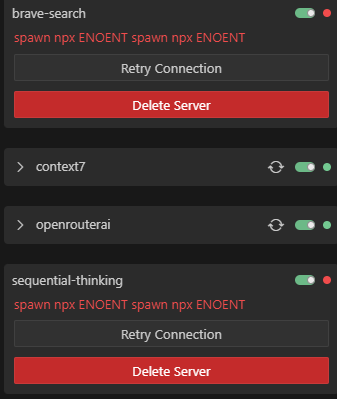
Fixing “spawn npx ENOENT” in Windows 11 When Adding MCP Server with Node/NPX

If you’re running into the error:

spawn npx ENOENT

while configuring an MCP (Multi-Context Plugin) server on Windows 11, you’re not alone. This error commonly appears when integrating tools like @upstash/context7-mcp using Node.js environments that rely on NPX, especially in cross-platform development.

This post explains:

  • What causes the “spawn npx ENOENT” error on Windows
  • The difference between two MCP server configuration methods
  • A working fix using cmd /c
  • Why this issue is specific to Windows

The Problem: “spawn npx ENOENT”

Using this configuration in your .mcprc.json or a similar setup:

{
  "mcpServers": {
    "context7": {
      "command": "npx",
      "args": ["-y", "@upstash/context7-mcp@latest"]
    }
  }
}

will cause the following error on Windows:

spawn npx ENOENT

This indicates that Node.js tried to spawn npx but couldn’t locate it in the system’s PATH.

Root Cause: Windows vs Unix Shell Behavior

On UNIX-like systems (Mac/Linux), spawn can run shell commands like npx directly. But Windows behaves differently:

  • Windows expects a .exe file to be explicitly referenced when spawning a process.
  • npx is not a native binary executable; it requires a shell to interpret and run it.
  • Node’s child_process.spawn does not invoke a shell by default unless specifically instructed.

In the failing example, the system tries to invoke npx directly as if it were a standalone executable, which doesn’t work on Windows.

The Fix: Wrapping with cmd /c

This configuration solves the issue:

{
  "context7": {
    "command": "cmd",
    "args": [
      "/c",
      "npx",
      "-y",
      "@upstash/context7-mcp@latest"
    ]
  }
}

Explanation

  • "cmd" invokes the Windows Command Prompt.
  • "/c" tells the shell to execute the command that follows.
  • The rest of the line (npx -y @upstash/context7-mcp@latest) is interpreted and executed properly by the shell.

This ensures that npx is resolved correctly and executed within a compatible environment.

Technical Comparison

Configuration Style Works on Windows? Shell Used? Reason
"command": "npx" No No Tries to execute npx directly without shell
"command": "cmd", "args": ["/c", "npx", ...] Yes Yes Executes the command within the Windows shell, allowing proper resolution

Best Practices

When using Node.js-based CLI tools across platforms:

  • Wrap shell commands using cmd /c (Windows) or sh -c (Unix)
  • Avoid assuming that commands like npx are executable as binaries
  • Test your scripts in both Windows and Unix environments when possible

Conclusion

If you’re encountering the spawn npx ENOENT error when configuring MCP servers on Windows 11, the fix is straightforward: use cmd /c to ensure shell interpretation. This small change ensures compatibility and prevents runtime errors across different operating systems.

What is OCPP? A Complete Guide to the EV Charging Communication Protocol

As electric vehicles (EVs) become more mainstream, the infrastructure that powers them is evolving rapidly. Behind the scenes of every public EV charger is a smart communication layer that ensures chargers operate efficiently, securely, and interoperably. That communication standard is called OCPP — Open Charge Point Protocol.

In this article, we’ll break down what OCPP is, why it matters, how it works, and the different versions available today. Whether you’re an EV driver, charging network operator, or tech enthusiast, this guide will help you understand how OCPP is shaping the future of electric mobility.

🔌 What is OCPP?

OCPP (Open Charge Point Protocol) is an application protocol used to enable communication between Electric Vehicle Supply Equipment (EVSE)—commonly known as EV chargers—and a Central Management System (CMS), often referred to as a Charge Point Operator (CPO) backend.

It is vendor-neutral and open-source, developed by the Open Charge Alliance (OCA) to standardize how EV chargers and management systems talk to each other.

Think of OCPP as the universal “language” between the charging station and the software that manages it.

⚙️ How OCPP Works

OCPP defines a set of WebSocket-based or SOAP-based messages that are exchanged between the client (charge point) and the server (backend system).

For example:

  • When a driver plugs in their EV, the charger sends a StartTransaction message to the backend.
  • The backend authenticates the session and sends a StartTransactionConfirmation.
  • Once charging ends, the charger sends a StopTransaction message.

Other key message types include:

  • Heartbeat: to ensure the charger is online
  • StatusNotification: to report charger availability
  • BootNotification: sent when the charger powers up
  • MeterValues: for usage data and billing
  • FirmwareUpdate, Diagnostics, and RemoteStart/Stop commands

These interactions enable remote control, monitoring, diagnostics, and software updates — all of which are essential for smart charging infrastructure.

🚀 Why is OCPP Important?

  • Interoperability: OCPP allows chargers from different manufacturers to connect to any compliant backend, reducing vendor lock-in.
  • Scalability: Operators can manage thousands of chargers efficiently using a single system.
  • Smart Charging: OCPP supports load balancing, grid integration, and energy optimization.
  • Security: Latest versions support enhanced encryption, authentication, and access control mechanisms.

OCPP is especially important for public EV charging networks, fleet operators, municipalities, and utility companies that require flexibility and operational efficiency.

🔢 OCPP Versions Explained

Over the years, OCPP has evolved to meet the growing demands of EV infrastructure. Here’s a look at its major versions:

OCPP 1.2 (2009)

  • The first version
  • Limited functionality
  • Largely outdated and no longer used

OCPP 1.5

  • Improved stability
  • Better message structure
  • Still lacks advanced features

OCPP 1.6 (2015)

  • Most widely deployed version
  • Supports JSON over WebSocket and SOAP
  • Adds:
    • Remote Start/Stop
    • Smart Charging (Load Profiles)
    • Firmware Management
    • Diagnostics
  • Still supported by most major networks today

OCPP 2.0 (2018)

  • Major overhaul of the protocol
  • Adds:
    • Device Management
    • Security Profiles
    • ISO 15118 integration (Plug & Charge)
    • Improved Smart Charging
    • Better data modeling

OCPP 2.0.1 (2020)

  • The latest and stable version
  • Focused on bug fixes and practical enhancements from real-world implementations
  • Growing adoption in next-generation networks

📝 Note: OCPP 2.x is not backward compatible with 1.6, but many platforms support dual-stack operation.

🛠️ Technical Architecture Overview

A typical OCPP-based EV charging setup consists of:

  1. Charge Point (Client):
    • Hardware installed at EV charging stations
    • Acts as the OCPP client
    • Initiates communication
  2. Central System (Server):
    • Backend system that processes OCPP messages
    • Manages user sessions, pricing, diagnostics, and energy usage
  3. Communication Layer:
    • Typically uses WebSockets over TLS for secure, real-time, full-duplex communication
    • Some older implementations use SOAP over HTTP
  4. Optional Add-ons:
    • Token authentication (RFID, app-based)
    • OCPI/OSCP/ISO 15118 integration for roaming and advanced smart grid features

🔒 Security in OCPP

Starting with OCPP 2.0, the protocol includes support for secure communication profiles, including:

  • TLS Encryption
  • Client-side and server-side certificates
  • Secure firmware updates
  • Signed metering and transaction data

These features make OCPP ready for enterprise-scale, mission-critical deployments.

🌍 Real-World Use Cases

  • Public Charging Networks: Roaming across different charger brands
  • Fleet Management: Real-time diagnostics and energy consumption tracking
  • Retail Sites & Fuel Stations: Revenue tracking and load optimization
  • Smart Cities & Utilities: Demand response and grid integration

📈 Final Thoughts

OCPP is the backbone of modern EV charging infrastructure. As the electric vehicle ecosystem expands, having a universal, open, and future-ready protocol like OCPP ensures that EV charging remains reliable, scalable, and secure.

Whether you’re deploying 5 chargers in a parking lot or 5,000 across a city, OCPP gives you the flexibility to choose the hardware and software that suit your needs — all while ensuring interoperability with the rest of the EV ecosystem.

Want to learn more about OCPP, EV charging, or smart infrastructure? Follow this blog for future deep-dives, comparisons, and real-world implementation guides!

Scraping JSON-LD from a Next.js Site with Crawl4AI: My Debugging Journey

Scraping data from modern websites can feel like a puzzle, especially when they’re built with Next.js and all that fancy JavaScript magic. Recently, I needed to pull some product info—like names, prices, and a few extra details—from an e-commerce page that was giving me a headache. The site (let’s just call it https://shop.example.com/products/[hidden-stuff]) used JSON-LD tucked inside a <script> tag, but my first attempts with Crawl4AI came up empty. Here’s how I cracked it, step by step, and got the data I wanted.

The Headache: Empty Results from a Next.js Page

I was trying to grab details from a product page—think stuff like the item name, description, member vs. non-member prices, and some category info. The JSON-LD looked something like this (I’ve swapped out the real details for a fake example):

{
  "@context": "https://schema.org",
  "@type": "Product",
  "name": "Beginner’s Guide to Coffee Roasting",
  "description": "Learn the basics of roasting your own coffee beans at home. Recorded live last summer.",
  "provider": {
    "@type": "Organization",
    "name": "Bean Enthusiast Co."
  },
  "offers": [
    {"@type": "Offer", "price": 49.99, "priceCurrency": "USD"},
    {"@type": "Offer", "price": 59.99, "priceCurrency": "USD"}
  ],
  "skillLevel": "Beginner",
  "hasWorkshop": [
    {
      "@type": "WorkshopInstance",
      "deliveryMethod": "Online",
      "workshopSchedule": {"startDate": "2024-08-15"}
    }
  ]
}

My goal was to extract this, label the cheaper price as “member” and the higher one as “non-member,” and snag extras like skillLevel and deliveryMethod. Simple, right? Nope. My first stab at it with Crawl4AI gave me nothing—just an empty [].

What Went Wrong: Next.js Threw Me a Curveball

Next.js loves doing things dynamically, which means the JSON-LD I saw in my browser’s dev tools wasn’t always in the raw HTML Crawl4AI fetched. I started with this basic setup:

from crawl4ai import AsyncWebCrawler
from crawl4ai.extraction_strategy import JsonCssExtractionStrategy

schema = {
    "name": "Product Schema",
    "baseSelector": "script[type='application/ld+json']",
    "fields": [{"name": "json_ld_content", "selector": "script[type='application/ld+json']", "type": "text"}]
}

async def extract_data(url):
    async with AsyncWebCrawler() as crawler:
        result = await crawler.arun(url=url, extraction_strategy=JsonCssExtractionStrategy(schema))
        extracted_data = json.loads(result.extracted_content)
        print(extracted_data)

# Output: []

Empty. Zilch. I dug into the debug output and saw the JSON-LD was in result.html, but result.extracted_content was blank. Turns out, Next.js was injecting that <script> tag after the page loaded, and Crawl4AI wasn’t catching it without some extra nudging.

How I Fixed It: A Workaround That Worked

After banging my head against the wall, I figured out I needed to make Crawl4AI wait for the JavaScript to do its thing and then grab the JSON-LD myself from the HTML. Here’s the code that finally worked:

import json
import asyncio
from crawl4ai import AsyncWebCrawler

async def extract_product_schema(url):
    async with AsyncWebCrawler(verbose=True, user_agent="Mozilla/5.0") as crawler:
        print(f"Checking out: {url}")
        result = await crawler.arun(
            url=url,
            js_code=[
                "window.scrollTo(0, document.body.scrollHeight);",  # Wake up the page
                "await new Promise(resolve => setTimeout(resolve, 5000));"  # Give it 5 seconds
            ],
            bypass_cache=True,
            timeout=30
        )

        if not result.success:
            print(f"Oops, something broke: {result.error_message}")
            return None

        # Digging into the HTML myself
        html = result.html
        start_marker = '<script type="application/ld+json">'
        end_marker = '</script>'
        start_idx = html.find(start_marker) + len(start_marker)
        end_idx = html.find(end_marker, start_idx)

        if start_idx == -1 or end_idx == -1:
            print("Couldn’t find the JSON-LD.")
            return None

        json_ld_raw = html[start_idx:end_idx].strip()
        json_ld = json.loads(json_ld_raw)

        # Sorting out the product details
        if json_ld.get("@type") == "Product":
            offers = sorted(
                [{"price": o.get("price"), "priceCurrency": o.get("priceCurrency")} for o in json_ld.get("offers", [])],
                key=lambda x: x["price"]
            )
            workshop_instances = json_ld.get("hasWorkshop", [])
            schedule = workshop_instances[0].get("workshopSchedule", {}) if workshop_instances else {}
            
            product_info = {
                "name": json_ld.get("name"),
                "description": json_ld.get("description"),
                "providerName": json_ld.get("provider", {}).get("name"),
                "memberPrice": offers[0] if offers else None,
                "nonMemberPrice": offers[-1] if offers else None,
                "skillLevel": json_ld.get("skillLevel"),
                "deliveryMethod": workshop_instances[0].get("deliveryMethod") if workshop_instances else None,
                "startDate": schedule.get("startDate")
            }
            return product_info
        print("No product data here.")
        return None

async def main():
    url = "https://shop.example.com/products/[hidden-stuff]"
    product_data = await extract_product_schema(url)
    if product_data:
        print("Here’s what I got:")
        print(json.dumps(product_data, indent=2))

if __name__ == "__main__":
    asyncio.run(main())

What I Got Out of It

{
  "name": "Beginner’s Guide to Coffee Roasting",
  "description": "Learn the basics of roasting your own coffee beans at home. Recorded live last summer.",
  "providerName": "Bean Enthusiast Co.",
  "memberPrice": {
    "price": 49.99,
    "priceCurrency": "USD"
  },
  "nonMemberPrice": {
    "price": 59.99,
    "priceCurrency": "USD"
  },
  "skillLevel": "Beginner",
  "deliveryMethod": "Online",
  "startDate": "2024-08-15"
}

How I Made It Work

Waiting for JavaScript: I told Crawl4AI to scroll and hang out for 5 seconds with js_code. That gave Next.js time to load everything up.DIY Parsing: The built-in extractor wasn’t cutting it, so I searched the HTML for the <script> tag and pulled the JSON-LD out myself.Price Tags: Sorted the prices and called the lowest “member” and the highest “non-member”—seemed like a safe bet for this site.

What I Learned Along the Way

  • Next.js is Tricky: It’s not just about the HTML you get—it’s about what shows up after the JavaScript runs. Timing is everything.
  • Sometimes You Gotta Get Hands-On: When the fancy tools didn’t work, digging into the raw HTML saved me.
  • Debugging Pays Off: Printing out the HTML and extractor output showed me exactly where things were going wrong.

Semantically Generating NuGet Package Versions: Best Practices Using Branch Conventions in Azure DevOps Pipelines

Learn how to streamline NuGet package versioning in Azure DevOps pipelines by generating semantic versions based on branch conventions. Proper versioning is essential for effective package management, and semantic versioning ensures compatibility and clear communication of changes.

a few main use cases for this e.g when you want to share schema of common objects or library across different micro services/API but at the same time you would be able to make a minor changes and try it on your micro service before it is being merged to master therefore you want to create a nuget package version that is just for development or testing purpose before it is going to be merged. This is all possible and is managed through versioning convention

A few things to look below are – the variables (Major, Minor, Patch, versionPatch, versionNumber) and you can also look at how we have a task to append “alpha” and you can also change to “beta” to the version variable when the branch is not master. You also need to set the versioningScheme on nuget pack to use the version variable that you defined above versionNumber

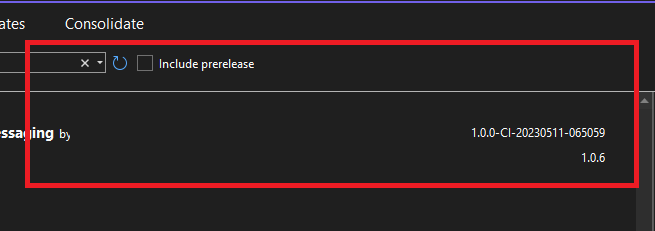
For the stable version now you can see in nuget package manager and make sure to untick “Prerelease”

While for the version comes off the branch now you need to tick “include prerelease”

Sample pipelines yml below

trigger:
  batch: true
  branches:
    include:
    - '*'

pool:
  vmImage: ubuntu-latest

variables:  
  projectName: 'Contoso.Messaging.csproj'
  projectPath: '**/Contoso.Messaging.csproj'
  buildPlatform: 'Any CPU'
  buildConfiguration: 'Release'
  Major: '1'
  Minor: '0'
  Patch: '0'
  versionPatch: $[counter(variables['Patch'], 0)]
  versionNumber: $(Major).$(Minor).$(versionPatch)

steps:

# Add this Command to Include the .NET 6 SDK
- task: UseDotNet@2
  displayName: Use .NET 6.0
  inputs:
    packageType: 'sdk'
    version: '6.0.x'

- task: DotNetCoreCLI@2
  displayName: 'Restore'
  inputs:
    command: 'restore'
    projects: '$(projectPath)'

- task: DotNetCoreCLI@2
  displayName: 'Build'
  inputs:
    command: 'build'
    arguments: '--configuration $(buildConfiguration) -p:Version=$(versionNumber)'
    projects: '$(projectPath)'
    
- script: echo '##vso[task.setvariable variable=versionNumber]$(versionNumber)-alpha'
  displayName: "Set Nuget package version number"
  condition: ne(variables['Build.SourceBranchName'], 'master')

- task: DotNetCoreCLI@2
  displayName: 'Pack'
  inputs:
    command: 'pack'
    packagesToPack: '**/*.csproj'
    versioningScheme: 'byEnvVar'
    versionEnvVar: 'versionNumber'
    outputDir: '$(Build.ArtifactStagingDirectory)'

- task: NuGetAuthenticate@0
  displayName: 'NuGet Authenticate'

- task: NuGetCommand@2
  displayName: 'NuGet push'
  inputs:
    command: push
    nuGetFeedType: 'internal'
    publishVstsFeed: 'xxxxxxxxxxxxxxxxxx'
    allowPackageConflicts: true

Dynamic Deserialization using JsonConverter

This post is the continuation from the previous post. The previous post was in regard to casting the object dynamically. This post will explain how to deserialize dynamically from Json object

I have a json that I want to deserialize dynamically based on a specific property that defines what object it is. We can do it easily and elegantly by using JsonConverter

1. Create a custom JsonConverter
[code language=”csharp”]
public class MessageConverter : JsonConverter
{
static readonly JsonSerializerSettings SpecifiedSubclassConversion = new JsonSerializerSettings() { ContractResolver = new CamelCasePropertyNamesContractResolver() };

public override bool CanConvert(Type objectType)
{
return (objectType == typeof(WhafflMetadata));
}

public override object ReadJson(JsonReader reader, Type objectType, object existingValue, JsonSerializer serializer)
{
var jObject = JObject.Load(reader);

switch (jObject["messageType"].Value<string>())
{
case "STAFF_CREATED":
return JsonConvert.DeserializeObject<Message<StaffDetail>>(jObject.ToString(), SpecifiedSubclassConversion);

case "CITY_CREATED":
return JsonConvert.DeserializeObject<Message<City>>(jObject.ToString(), SpecifiedSubclassConversion);

default:
throw new Exception(string.Format("messageType {0} cannot be handled", jObject["messageType"].Value<string>()));
}
}

public override bool CanWrite
{
get { return false; }
}

public override void WriteJson(JsonWriter writer, object value, JsonSerializer serializer)
{
throw new NotImplementedException();
}
}
[/code]

2. Cast it using your converter

[code language=”csharp”]
JsonConvert.DeserializeObject<Message>(
jsonValue,
new JsonSerializerSettings { Converters = new JsonConverter[] { new MessageConverter() } });
[/code]

401 Unauthorized – WebRequest

I got this nasty 401 unauthorized error from my code all of sudden, I don’t really know why and what’s causing it. I used Fiddler as a proxy to see the request header and all of sudden it works but then removing the proxy again brings back the 401!!!

So after googling for a while i found something interesting about browser was requesting for authentication level etc therefore even if you pass the basic security header then it will just simply ignore it. So I played around with the code below and it fixes my issue

WebRequest request = WebRequest.Create(source);
request.AuthenticationLevel = System.Net.Security.AuthenticationLevel.MutualAuthRequested;

Penetration Testing Security Tool

There are few applications/tools out there that can be used to test the security of your application. Check below

Contrast
http://www.contrastsecurity.com/

Burp
https://portswigger.net/burp/

Zap – Free
https://www.owasp.org/index.php/OWASP_Zed_Attack_Proxy_Project

Action Filter in WebApi 2

Its been a while I haven’t blogged for sometime. To create an action filter in Web Api 2 and return the response directly you can use the code below

public class StepUpAttribute : ActionFilterAttribute
{
public IUserFactory CurrentUser { get; set; }

public override void OnActionExecuting(HttpActionContext filterContext)
{
if (CurrentUser.IsSteppedUp)
return;

// stop request process and return
filterContext.Response = filterContext.Request.CreateResponse(HttpStatusCode.OK,
ErrorResponseFactory.FromUnsafeActionDetectedResponse(),
filterContext.ControllerContext.Configuration.Formatters.JsonFormatter);

}
}

Replace Invisible Characters – Control Chars

You can use this function to replace the invisible chars

Regex.Replace(s, @"[^\x20-\x7F]", "");

Camel Case for Web Api 2

To convert your DTO to become Camel Case, you can use the code below

//Camel Case settings
var settings = GlobalConfiguration.Configuration.Formatters.JsonFormatter.SerializerSettings;
settings.ContractResolver = new CamelCasePropertyNamesContractResolver();
settings.Formatting = Formatting.Indented;

Page 1 of 4

Powered by WordPress & Theme by Anders Norén