Technical Insights: Azure, .NET, Dynamics 365 & EV Charging Architecture

Category: .NET Page 1 of 4

Dotnet general

Microsoft Azure Service Bus Exception: “Cannot allocate more handles. The maximum number of handles is 4999”

When working with Microsoft Azure Service Bus, you may encounter the following exception:

“Cannot allocate more handles. The maximum number of handles is 4999.”

This issue typically arises due to improper dependency injection scope configuration for the ServiceBusClient. In most cases, the ServiceBusClient is registered as Scoped instead of Singleton, leading to the creation of multiple instances during the application lifetime, which exhausts the available handles.

In this blog post, we’ll explore the root cause and demonstrate how to fix this issue by using proper dependency injection in .NET applications.

Understanding the Problem

Scoped vs. Singleton

  1. Scoped: A new instance of the service is created per request.
  2. Singleton: A single instance of the service is shared across the entire application lifetime.

The ServiceBusClient is designed to be a heavyweight object that maintains connections and manages resources efficiently. Hence, it should be registered as a Singleton to avoid excessive resource allocation and ensure optimal performance.

Before Fix: Using Scoped Registration

Here’s an example of the problematic configuration:

public void ConfigureServices(IServiceCollection services)
{
    services.AddScoped(serviceProvider =>
    {
        string connectionString = Configuration.GetConnectionString("ServiceBus");
        return new ServiceBusClient(connectionString);
    });

    services.AddScoped<IMessageProcessor, MessageProcessor>();
}

In this configuration:

  • A new instance of ServiceBusClient is created for each HTTP request or scoped context.
  • This quickly leads to resource exhaustion, causing the “Cannot allocate more handles” error.

Solution: Switching to Singleton

To fix this, register the ServiceBusClient as a Singleton, ensuring a single instance is shared across the application lifetime:

public void ConfigureServices(IServiceCollection services)
{
    services.AddSingleton(serviceProvider =>
    {
        string connectionString = Configuration.GetConnectionString("ServiceBus");
        return new ServiceBusClient(connectionString);
    });

    services.AddScoped<IMessageProcessor, MessageProcessor>();
}

In this configuration:

  • A single instance of ServiceBusClient is created and reused for all requests.
  • Resource usage is optimized, and the exception is avoided.

Sample Code: Before and After

Before Fix (Scoped Registration)

public interface IMessageProcessor
{
    Task ProcessMessageAsync();
}

public class MessageProcessor : IMessageProcessor
{
    private readonly ServiceBusClient _client;

    public MessageProcessor(ServiceBusClient client)
    {
        _client = client;
    }

    public async Task ProcessMessageAsync()
    {
        ServiceBusReceiver receiver = _client.CreateReceiver("queue-name");
        var message = await receiver.ReceiveMessageAsync();
        Console.WriteLine($"Received message: {message.Body}");
        await receiver.CompleteMessageAsync(message);
    }
}

After Fix (Singleton Registration)

public void ConfigureServices(IServiceCollection services)
{
    // Singleton registration for ServiceBusClient
    services.AddSingleton(serviceProvider =>
    {
        string connectionString = Configuration.GetConnectionString("ServiceBus");
        return new ServiceBusClient(connectionString);
    });

    services.AddScoped<IMessageProcessor, MessageProcessor>();
}

public class MessageProcessor : IMessageProcessor
{
    private readonly ServiceBusClient _client;

    public MessageProcessor(ServiceBusClient client)
    {
        _client = client;
    }

    public async Task ProcessMessageAsync()
    {
        ServiceBusReceiver receiver = _client.CreateReceiver("queue-name");
        var message = await receiver.ReceiveMessageAsync();
        Console.WriteLine($"Received message: {message.Body}");
        await receiver.CompleteMessageAsync(message);
    }
}

Key Takeaways

  1. Always use Singleton scope for ServiceBusClient to optimize resource usage.
  2. Avoid using Scoped or Transient scope for long-lived, resource-heavy objects.
  3. Test your application under load to ensure no resource leakage occurs.

Sending Apple Push Notification for Live Activities Using .NET

In the evolving world of app development, ensuring real-time engagement with users is crucial. Apple Push Notification Service (APNs) enables developers to send notifications to iOS devices, and with the introduction of Live Activities in iOS, keeping users updated about ongoing tasks is easier than ever. This guide demonstrates how to use .NET to send Live Activity push notifications using APNs.

Prerequisites

Before diving into the code, ensure you have the following:

  1. Apple Developer Account with access to APNs.
  2. P8 Certificate downloaded from the Apple Developer Portal.
  3. Your Team ID, Key ID, and Bundle ID of the iOS application.
  4. .NET SDK installed on your system.

Overview of the Code

The provided ApnsService class encapsulates the logic to interact with APNs for sending push notifications, including Live Activities. Let’s break it down step-by-step:

1. Initializing APNs Service

The constructor sets up the base URI for APNs:

  • Use https://api.push.apple.com for production.
  • Use https://api.development.push.apple.com for the development environment.
_httpClient = new HttpClient { BaseAddress = new Uri("https://api.development.push.apple.com:443") };

2. Generating the JWT Token

APNs requires a JWT token for authentication. This token is generated using:

  • Team ID: Unique identifier for your Apple Developer account.
  • Key ID: Associated with the P8 certificate.
  • ES256 Algorithm: Uses the private key in the P8 certificate to sign the token.
private string GetProviderToken()
{
    double epochNow = (int)DateTime.UtcNow.Subtract(new DateTime(1970, 1, 1)).TotalSeconds;
    Dictionary<string, object> payload = new Dictionary<string, object>
    {
        { "iss", _teamId },
        { "iat", epochNow }
    };
    var extraHeaders = new Dictionary<string, object>
    {
        { "kid", _keyId },
        { "alg", "ES256" }
    };

    CngKey privateKey = GetPrivateKey();

    return JWT.Encode(payload, privateKey, JwsAlgorithm.ES256, extraHeaders);
}

3. Loading the Private Key

The private key is extracted from the .p8 file using BouncyCastle.

private CngKey GetPrivateKey()
{
    using (var reader = File.OpenText(_p8CertificateFileLocation))
    {
        ECPrivateKeyParameters ecPrivateKeyParameters = (ECPrivateKeyParameters)new PemReader(reader).ReadObject();
        var x = ecPrivateKeyParameters.Parameters.G.AffineXCoord.GetEncoded();
        var y = ecPrivateKeyParameters.Parameters.G.AffineYCoord.GetEncoded();
        var d = ecPrivateKeyParameters.D.ToByteArrayUnsigned();

        return EccKey.New(x, y, d);
    }
}

4. Sending the Notification

The SendApnsNotificationAsync method handles:

  • Building the request with headers and payload.
  • Adding apns-push-type as liveactivity for Live Activity notifications.
  • Adding a unique topic for Live Activities by appending .push-type.liveactivity to the Bundle ID.
public async Task SendApnsNotificationAsync<T>(string deviceToken, string pushType, T payload) where T : class
    {
        var jwtToken = GetProviderToken();
        var jsonPayload = JsonSerializer.Serialize(payload);
        // Prepare HTTP request
        var request = new HttpRequestMessage(HttpMethod.Post, $"/3/device/{deviceToken}")
        {
            Content = new StringContent(jsonPayload, Encoding.UTF8, "application/json")
        };
        request.Headers.Add("authorization", $"Bearer {jwtToken}");
        request.Headers.Add("apns-push-type", pushType);
        if (pushType == "liveactivity")
        {
            request.Headers.Add("apns-topic", _bundleId + ".push-type.liveactivity");
            request.Headers.Add("apns-priority", "10");
        }
        else
        {
            request.Headers.Add("apns-topic", _bundleId);
        }
        request.Version = new Version(2, 0);
        // Send the request
        var response = await _httpClient.SendAsync(request);
        if (response.IsSuccessStatusCode)
        {
            Console.WriteLine("Push notification sent successfully!");
        }
        else
        {
            var responseBody = await response.Content.ReadAsStringAsync();
            Console.WriteLine($"Failed to send push notification: {response.StatusCode} - {responseBody}");
        }
    }

Sample Usage

Here’s how you can use the ApnsService class to send a Live Activity notification:

var apnsService = new ApnsService();
 // Example device token (replace with a real one)
 var pushDeviceToken = "808f63xxxxxxxxxxxxxxxxxxxxxxxxxxxxxxxxxxxxxxxxxxxxxxxxxxxxxxxxxxxxxx";
 // Create the payload for the Live Activity
 var notificationPayload = new PushNotification
 {
     Aps = new Aps
     {
         Timestamp = DateTimeOffset.UtcNow.ToUnixTimeSeconds(),
         Event = "update",
         ContentState = new ContentState
         {
             Status = "Charging",
             ChargeAmount = "65 Kw",
             DollarAmount = "$11.80",
             timeDuration = "00:28",
             Percentage = 80
         },
     }
 };
 await apnsService.SendApnsNotificationAsync(pushDeviceToken, "liveactivity", notificationPayload);

Key Points to Remember

  1. JWT Token Validity: Tokens expire after 1 hour. Ensure you regenerate tokens periodically.
  2. APNs Endpoint: Use the correct environment (production or development) based on your app stage.
  3. Error Handling: Handle HTTP responses carefully. Common issues include invalid tokens or expired certificates.

Debugging Tips

  • Ensure your device token is correct and valid.
  • Double-check your .p8 file, Team ID, Key ID, and Bundle ID.
  • Use tools like Postman to test your APNs requests independently.

Conclusion

Sending Live Activity push notifications using .NET involves integrating APNs with proper authentication and payload setup. The ApnsService class demonstrated here provides a robust starting point for developers looking to enhance user engagement with real-time updates.🚀

Mastering Feature Flag Management with Azure Feature Manager

In the dynamic realm of software development, the power to adapt and refine your application’s features in real-time is a game-changer. Azure Feature Manager emerges as a potent tool in this scenario, empowering developers to effortlessly toggle features on or off directly from the cloud. This comprehensive guide delves into how Azure Feature Manager can revolutionize your feature flag control, enabling seamless feature introduction, rollback capabilities, A/B testing, and tailored user experiences.

Introduction to Azure Feature Manager

Azure Feature Manager is a sophisticated component of Azure App Configuration. It offers a unified platform for managing feature flags across various environments and applications. Its capabilities extend to gradual feature rollouts, audience targeting, and seamless integration with Azure Active Directory for enhanced access control.

Step-by-Step Guide to Azure App Configuration Setup

Initiating your journey with Azure Feature Manager begins with setting up an Azure App Configuration store. Follow these steps for a smooth setup:

  1. Create Your Azure App Configuration: Navigate to the Azure portal and initiate a new Azure App Configuration resource. Fill in the required details and proceed with creation.
  2. Secure Your Access Keys: Post-creation, access the “Access keys” section under your resource settings to retrieve the connection strings, crucial for your application’s connection to the Azure App Configuration.

Crafting Feature Flags

To leverage feature flags in your application:

  1. Within the Azure App Configuration resource, click on “Feature Manager” and then “+ Add” to introduce a new feature flag.
  2. Identify Your Feature Flag: Name it thoughtfully, as this identifier will be used within your application to assess the flag’s status

Application Integration Essentials

Installing Required NuGet Packages

Your application necessitates specific packages for Azure integration:

  • Microsoft.Extensions.Configuration.AzureAppConfiguration
  • Microsoft.FeatureManagement.AspNetCore

These can be added via your IDE or through the command line in your project directory:

dotnet add package Microsoft.Extensions.Configuration.AzureAppConfiguration
dotnet add package Microsoft.FeatureManagement.AspNetCore

Application Configuration

Modify your appsettings.json to include your Azure App Configuration connection string:

{
  "ConnectionStrings": {
    "AppConfig": "Endpoint=https://<your-resource-name>.azconfig.io;Id=<id>;Secret=<secret>"
  }
}

Further, in Program.cs (or Startup.cs for earlier .NET versions), ensure your application is configured to utilize Azure App Configuration and activate feature management:

var builder = WebApplication.CreateBuilder(args);

builder.Configuration.AddAzureAppConfiguration(options =>
{
    options.Connect(builder.Configuration["ConnectionStrings:AppConfig"])
           .UseFeatureFlags();
});

builder.Services.AddFeatureManagement();

Implementing Feature Flags

To verify a feature flag’s status within your code:

using Microsoft.FeatureManagement;

public class FeatureService
{
    private readonly IFeatureManager _featureManager;

    public FeatureService(IFeatureManager featureManager)
    {
        _featureManager = featureManager;
    }

    public async Task<bool> IsFeatureActive(string featureName)
    {
        return await _featureManager.IsEnabledAsync(featureName);
    }
}

Advanced Implementation: Custom Targeting Filter

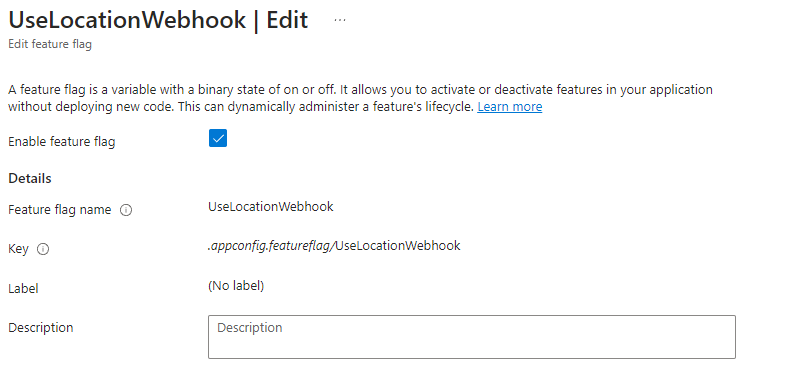
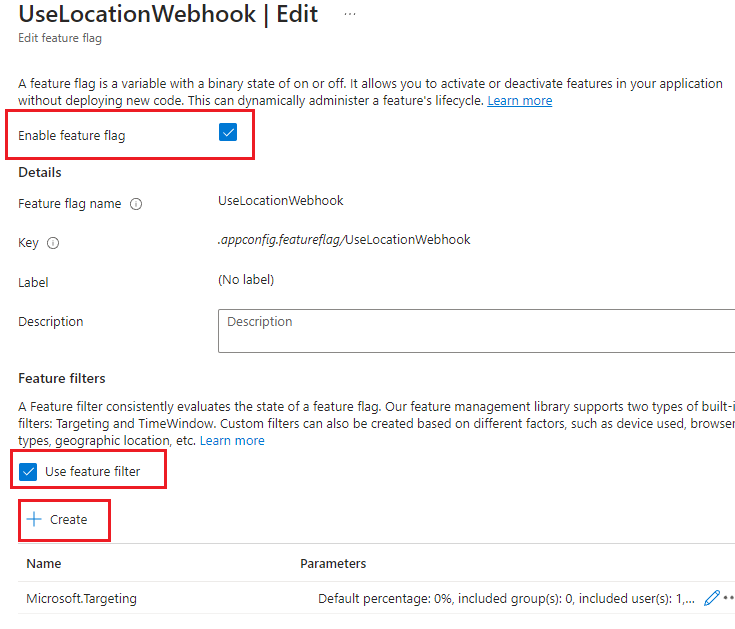
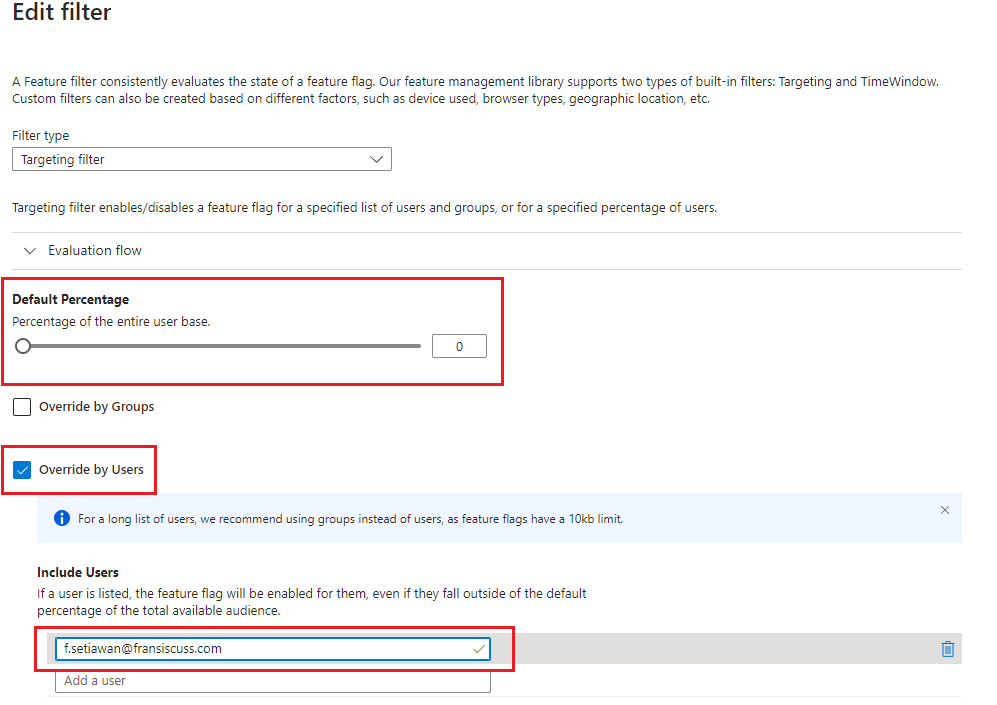
Go to Azure and modify your feature flag

Make sure the “Default Percentage” is set to 0 and in this scenario we want to target specific user based on its email address

For user or group-specific targeting, We need to implement ITargetingContextAccessor. In below example we target based on its email address where the email address comes from JWT

using Microsoft.FeatureManagement.FeatureFilters;
using System.Security.Claims;

namespace SampleApp
{
    public class B2CTargetingContextAccessor : ITargetingContextAccessor
    {
        private const string TargetingContextLookup = "B2CTargetingContextAccessor.TargetingContext";
        private readonly IHttpContextAccessor _httpContextAccessor;

        public B2CTargetingContextAccessor(IHttpContextAccessor httpContextAccessor)
        {
            _httpContextAccessor = httpContextAccessor;
        }

        public ValueTask<TargetingContext> GetContextAsync()
        {
            HttpContext httpContext = _httpContextAccessor.HttpContext;

            //
            // Try cache lookup
            if (httpContext.Items.TryGetValue(TargetingContextLookup, out object value))
            {
                return new ValueTask<TargetingContext>((TargetingContext)value);
            }

            ClaimsPrincipal user = httpContext.User;

            //
            // Build targeting context based off user info
            TargetingContext targetingContext = new TargetingContext
            {
                UserId = user.FindFirst("http://schemas.xmlsoap.org/ws/2005/05/identity/claims/emailaddress")?.Value,
                Groups = new string[] { }
            };

            //
            // Cache for subsequent lookup
            httpContext.Items[TargetingContextLookup] = targetingContext;

            return new ValueTask<TargetingContext>(targetingContext);
        }
    }
}

in Program.cs (or Startup.cs for earlier .NET versions), modify your Feature Management to use targeting filter

    builder.Services.AddFeatureManagement().WithTargeting<B2CTargetingContextAccessor>();

You also need to pass the targeting context to the feature manager

using Microsoft.FeatureManagement;

public class FeatureService
{
    private readonly IFeatureManager _featureManager;
    private readonly ITargetingContextAccessor _targetContextAccessor;

    public FeatureService(IFeatureManager featureManager, ITargetingContextAccessor targetingContextAccessor)
    {
        _featureManager = featureManager;
_targetContextAccessor = targetingContextAccessor;
    }

    public async Task<bool> IsFeatureActive()
    {
        return await _featureManager.IsEnabledAsync("UseLocationWebhook", _targetContextAccessor);
    }
}

Logging in .NET – Elastic Search, Kibana and Serilog

I’ve been using log4net in the past and I found it quite useful as it is ready to use out of the box. In my last workplace, we are using SPLUNK and its amazing as I’m able to troubleshoot production issue by looking at the trend and activities. You can do query based and filtering the log and build a pretty dashboard. Downside of it is the cost for Splunk is expensive (i don’t think its for the mainstream user or small business)

So I’ve found another logging mechanism/storage/tool which is amazing!! It is called Elastic Search and its open source (well there are different subscriptions level for better supports). Pretty much Elastic Search is the engine for search and analytics

How about the GUI/Dashboard?Yes you can use Kibana. It is an open source data visualization platform that allows you to interact with data

Ok, so lets say if I have a .NET, how do I write my log to Elastic Search?You can use SeriLog. It will allow you to log structured event data to your log and you can use Serilog Elastic Search sink to integrate with Elastic Search

Serilog has different sink providers that allow you to store your log externally (beside file) including SPLUNK

I will talk more about Serilog separately in different post, stay tune!

Automapper – Dynamic and Generic Mapping

In Automapper, we normally have 1 to 1 mapping defined but I have a case whereas the incoming stream as a json payload which then I cast it as a dynamic (using JObject parse) and in one of the property within the payload it defined which object that it needs to cast into. Lets take a look at the sample below

Input
Json payload to create a city

[code language=”javascript”]
{
"requestId": "C4910016-C30D-415C-89D3-D08D724429A6",
"messageType": "CITY_CREATED",
"categoryName": "categoryA",
"metadata": {
"city": "sydney",
"state": "NSW",
"postcode": "2000",
"country": "australia"
}
}
[/code]

at the same time we can also have a Json payload to create a staff

[code language=”javascript”]
{
"requestId":"C4910016-C30D-415C-89D3-D08D724429A6",
"messageType": "STAFF_CREATED",
"categoryName": "categoryB",
"staffDetail": {
"name": "fransiscus",
"dateOfBirth": "01/01/1950"
},
"location" : {
"cityId" : "1"
}
}
[/code]

So what we are doing in here, all the message will go into payload property (it can contain any object) and we add some extra information/header/metadata on the parent level
Desired Outputs

[code language=”javascript”]
{
"messageType": "CITY_CREATED",
"payload": {
"city": "sydney",
"state": "NSW",
"postcode": "2000",
"country": "australia"
},
"provider": "abc",
"providerRequestId": "C4910016-C30D-415C-89D3-D08D724429A6",
"receivedAt": "2015-09-30T23:53:58.6118521Z",
"lastUpdated": "2015-09-30T23:53:58.6128283Z",
"lastUpdater": "Transformer",
"attempt": 0
}
[/code]

[code language=”javascript”]
{
"messageType": "STAFF_CREATED",
"payload": {
"staffName": "fransiscus",
"dateOfBirth": "01/01/1950",
"cityId": "1"
},
"provider": "abc",
"providerRequestId": "C4910016-C30D-415C-89D3-D08D724429A6",
"receivedAt": "2015-09-30T23:53:58.6118521Z",
"lastUpdated": "2015-09-30T23:53:58.6128283Z",
"lastUpdater": "Transformer",
"attempt": 0
}
[/code]

To map this to a concrete class 1:1 mapping is straight forward and easy. The problem here is that the “messageType” is the one that decided which object that it should be

Automapper Configuration:

1. POCO object

abstract class that stores all the metadata

[code language=”csharp”]
public abstract class Metadata
{
public string MessageType { get; set; }

public string Provider { get; set; }

public string ProviderRequestId { get; set; }

public DateTime ReceivedAt { get; set; }

public DateTime LastUpdated { get; set; }

public string LastUpdater { get; set; }

public int Attempt { get; set; }

public List<string> Errors { get; set; }
}
[/code]

[code language=”csharp”]
public class City
{
public string CityName { get; set; }
public string State { get; set; }
public string PostCode { get; set; }
public string Country { get; set; }
}
[/code]

[code language=”csharp”]
public class StaffDetail
{
public string Name { get; set; }
public string DateOfBirth { get; set; }
public int CityId { get; set; }
}
[/code]

[code language=”csharp”]
public class Message<T> : Metadata where T : class
{
public T Payload { get; set; }
}
[/code]

2. Lets create a TypeConverter for the base class which is Metadata and from this converter it will return the derived class

[code language=”csharp”]
public class MetadataTypeConverter : TypeConverter<dynamic, Metadata>
{
protected override Metadata ConvertCore(dynamic source)
{
Metadata metadata;

var type = (string)source.messageType.Value;

switch (type)
{
case "STAFF_CREATED":
metadata = new Message<StaffDetail> { Payload = Mapper.Map<dynamic, StaffDetail>(source) };
break;
case "CITY_CREATED":
metadata = new Message<City> { Payload = Mapper.Map<dynamic, City>(source) };
break;

default: throw new Exception(string.Format("no mapping defined for {0}", source.messageType.Value));
}

metadata.ProviderRequestId = source.requestId;
metadata.Topic = string.Format("{0}.{1}.pregame",
producerTopicName,
source.categoryName ?? source.competition.categoryName);
metadata.Provider = "My Provider";
metadata.MessageType = source.messageType;
metadata.ReceivedAt = DateTime.UtcNow;
metadata.LastUpdated = DateTime.UtcNow;
metadata.LastUpdater = "Transformer";
metadata.Attempt = 0;

return metadata;
}
}
[/code]

3. Lets create a TypeConverter for the derived class which are Staff and City

[code language=”csharp”]
public class CityTypeConverter : TypeConverter<dynamic, City>
{
protected override City ConvertCore(dynamic source)
{
City city = new City();
city.CityName = source.metadata.city;
city.State = source.metadata.state;
city.Postcode = source.metadata.postcode;
city.Country = source.metadata.country;

return city;
}
}
[/code]

[code language=”csharp”]
public class StaffDetailTypeConverter : TypeConverter<dynamic, StaffDetail>
{
protected override StaffDetail ConvertCore(dynamic source)
{
StaffDetail staffdetail = new StaffDetail();
staffdetail.Name = source.staffDetail.name;
staffdetail.DateOfBirth = source.staffDetail.dateOfBirth;
staffdetail.CityId = source.location.cityId;

return staffdetail;
}
}
[/code]

3. Define the Automapper mapping in the configuration

[code language=”csharp”]
public class WhafflMessageMapping : Profile
{
public override string ProfileName
{
get
{
return this.GetType().Name;
}
}

protected override void Configure()
{
this.CreateMap()
.ConvertUsing(new MetadataTypeConverter());

this.CreateMap()
.ConvertUsing(new StaffDetailTypeConverter());

this.CreateMap()
.ConvertUsing(new CityTypeConverter());
}

private Metadata BuildWhafflMessage(dynamic context)
{
var type = ((string)context.messageType.Value);

switch (type)
{
case "STAFF_CREATED":
return new Message { Payload = Mapper.Map(context) };
case "CITY_CREATED:
return new Message { Payload = Mapper.Map(context) };

default: throw new Exception(string.Format("no mapping defined for {0}", context.messageType.Value));
}

}
}
[/code]

Fusion Log – Assembly Logging

Another helpful debugging tool that can be used is FusionLog – it is already installed in your machine by default and what this tool does is basically logging and telling us where the assembly is loaded from either local or GAC or some other location and at the same time it tells you it couldn’t locate the assembly

-First create a folder called “FusionLog” on C drive or any location with any name

-Open your Regedit to add the key below

HKEY_LOCAL_MACHINESOFTWAREMicrosoftFusion

Add:

DWORD ForceLog set value to 1

DWORD LogFailures set value to 1

DWORD LogResourceBinds set value to 1

String LogPath set value to folder for logs (e.g. C:FusionLog)

Make sure you include the backslash after the folder name and that the Folder exists.

-Restart your computer

-Run your application

-Look the assembly name from c:fusionlog

-Open the file and it will tell you where the assembly is loaded from

Entity Framework – Schema MigrateDatabaseToLatestVersion

I’ve been using EF for quite sometimes and I use Code First to build my schema. The question that I always have in mind is “Once the project is released and we need to add a new entity or add a new column  to the existing entity, how do we tackle that?” and the question is even asked by my colleague. My answer was “oh, we can track down our changes by hand on a SQL file” and “I also try to be smart by saying we can get the latest production DB and compare it with the Development DB locally by using Database project or by using RedGate Schema Compare”


I’m still not happy even with my own answer!! and I believe that it’s not only me facing this problem and Microsoft should be smart enough to tackle this problem. So I start doing my research and I found the answer that I’m looking for – EF has an initializer called “MigrateDatabaseToLatestVersion” which accept 2 parameters DB Context and Configuration. So what is Configuration?It is a class that inherits from DbMigrationsConfiguration

So how do I get this class?There are 2 possible ways:

1. Use PackageManager Console (on your data layer project) and type the code below and it will create a new folder called “Migration” and a file with name “Configuration”

[code language=”bash”]PM>enable-migrations -enableautomaticmigration [/code]

2. Create a file called “Configuration.cs/.vb” or with whatever name that you wanted and paste the code below

[code language=”csharp”]
namespace GenericSolution.Data.Migrations
{
using System;
using System.Data.Entity;
using System.Data.Entity.Migrations;
using System.Linq;
using GenericSolution.Data;

internal sealed class Configuration : DbMigrationsConfiguration<GenericSolutionContext>
{
public Configuration()
{
AutomaticMigrationsEnabled = true;
//***DO NOT REMOVE THIS LINE,
//DATA WILL BE LOST ON A BREAKING SCHEMA CHANGE,
//TALK TO OTHER PARTIES INVOLVED IF THIS LINE IS CAUSING PROBLEMS
AutomaticMigrationDataLossAllowed = true;
}

protected override void Seed(GenericSolutionContext context)
{
// This method will be called after migrating to the latest version.

// You can use the DbSet<T>.AddOrUpdate() helper extension method
// to avoid creating duplicate seed data. E.g.
//
// context.People.AddOrUpdate(
// p => p.FullName,
// new Person { FullName = "Andrew Peters" },
// new Person { FullName = "Brice Lambson" },
// new Person { FullName = "Rowan Miller" }
// );
//
}
}
}
[/code]

*AutomaticMigrationDataLossAllowed is a property that allow you to automatically drop the column from the schema when you remove a property from your entity class. By default, it sets to false which means it will throw an exception “AutomaticDataLossException” when you try to remove column from your table. So please use it cautiously

Next step is to use this configuration on your DBContext initializer which can be on your DBFactory class

[code language=”csharp”]
public DBFactory()
{
//Create database when not exists with code below
//Database.SetInitializer(new CreateDatabaseIfNotExists<GenericSolutionContext>());

//Pass null when you already have the database exists and no changes
//Database.SetInitializer<GenericSolutionContext>(null);

//Automatic schema migration
Database.SetInitializer(new MigrateDatabaseToLatestVersion<GenericSolutionContext, Configuration>());

}
[/code]

There is another class that will create an empty migration so that the future migrations will start from the current state of your database. I will update this blog once I know in detail about the functionality of it

1. Getting it by using PM Console

[code language=”bash”]PM> Add-Migration InitialMigration -IgnoreChanges[/code]

2. Create a class

[code language=”csharp”]
namespace GenericSolution.Data.Migrations
{
using System;
using System.Data.Entity.Migrations;

public partial class InitialMigration : DbMigration
{
public override void Up()
{
}

public override void Down()
{
}
}
}
[/code]

MSMQ – Basic Tutorial

I write this article in advance for my technical presentation. MSMQ is a messaging platform by Microsoft and it is built-in on the OS itself.

Installation

1. To install MSMQ, you can go to “Add/Remove program” then go to “Turn Windows features on or off” and then check “Microsoft Message Queue” Server

2. Check in the Services (services.msc), it will install “Message Queuing” service and “Net.Msmq Listener Adapter” and it should be automatically started once you have installed it

3. Make sure that these ports are not blocked by your firewall because MSMQ are using this ports

TCP: 1801
RPC: 135, 2101*, 2103*, 2105*
UDP: 3527, 1801

Basic Operation

1. in order to see your queue, you can go to “computer management – right click my computer and select manage”. Go to Services and Applications node and there will be a sub node called as “Message Queuing”

2. From this console, you can see all the messages that you want to see

3. in my presentation slides there are definitions of private queues and public queues or you can get more detail from MSDN.

4. For this tutorial, please create a private queue called as “Sample Queue” by right clicking the private queue and select “Add”

Coding tutorial

*Please import System.Messaging

1. How to send a message into a queue

Code Snippet
  1. private const string MESSAGE_QUEUE = @”.\Private$\Sample Queue”;
  2.         private MessageQueue _queue;
  3.         private void SendMessage(string message)
  4.         {
  5.             _queue = new MessageQueue(MESSAGE_QUEUE);
  6.             Message msg = new Message();
  7.             msg.Body = message;
  8.             msg.Label = “Presentation at “ + DateTime.Now.ToString();
  9.             _queue.Send(msg);
  10.             lblError.Text = “Message already sent”;
  11.         }

2. Check the queue through MMC console – right click and select refresh

2. Right click on the message and go to Body then you can see that the message is being stored as XML

3. How to process the queue?See the code snippet below

Code Snippet
  1. private const string MESSAGE_QUEUE = @”.\Private$\Sample Queue”;
  2.         private static void CheckMessage()
  3.         {
  4.             try
  5.             {
  6.                 var queue = new MessageQueue(MESSAGE_QUEUE);
  7.                 var message = queue.Receive(new TimeSpan(0, 0, 1));
  8.                 message.Formatter = new XmlMessageFormatter(
  9.                                     new String[] { “System.String,mscorlib” });
  10.                 Console.WriteLine(message.Body.ToString());
  11.             }
  12.             catch(Exception ex)
  13.             {
  14.                 Console.WriteLine(“No Message”);
  15.             }
  16.         }

Queue.Receive is a synchronous process and by passing the timespan into the function, meaning that it will throw exception of Timeout if it hasn’t received any within the duration specified

-The formatter is used to cast back to the original type

-Then you can collect the message by using “Message.Body”

-Once it’s done the message will be removed from your queue

Conclusion

Pros:

Ready to be used – It provides simple queuing for your application without you need to recreate one/reinvent the wheel

Interoperability – It allows other application to collect/process the message from MSMQ

Cons:

-Message poisoning can happen (when a message cannot be process and blocks entire queue)
-Message and queues are in proprietary format which cannot be edited directly
-The only tool is MMC administration console, or you can buy QueueExplorer (3rd party software
)

My Slides:

http://portal.sliderocket.com/vmware/MSMQ-Microsoft-Message-Queue

*DISCLAIMER:this tutorial does not represent the company that I’m working for in any way. This is just a tutorial that I created personally


Yield keyword in .NET

I believe some of you already know about this but for me I never used it. Yield keyword has been existed since .NET 2.0 so I decided to look up of what it does and try to understand it

Based on MSDN

Yield is used in an iterator block to provide a value to the enumerator object or to signal the end of iteration, it takes one of the following form

Based on my understanding

Yield is a concatenation for a collection, or in SQL we normally use UNION

Yield break; is used to exit from the concatenation (remember it is not used to skip !)

One practical sample that I can think of is to get the enumerable of exception from inner exception (e.g stack trace)

sample code

Code Snippet
  1. class Program
  2.     {
  3.         ///<summary>
  4.         /// simple function to return IEnumerable of integer
  5.         ///</summary>
  6.         ///<returns></returns>
  7.         private static IEnumerable<int> GetIntegers()
  8.         {
  9.             for (int i = 0; i <= 10; i++)
  10.                 yield return i;
  11.         }
  12.         ///<summary>
  13.         /// simple function to return collection of class
  14.         ///</summary>
  15.         ///<returns></returns>
  16.         private static IEnumerable<MyClass> GetMyNumbers()
  17.         {
  18.             for (int i = 0; i <= 10; i++)
  19.                 if (i > 5)
  20.                     yield break;
  21.                 else
  22.                     yield return new MyClass() { Number = i };
  23.         }
  24.         internal class MyClass
  25.         {
  26.             public int Number { get; set; }
  27.             public string PrintNumber
  28.             {
  29.                 get {
  30.                     return “This is no “ + Number.ToString();
  31.                 }
  32.             }
  33.         }
  34.         static void Main(string[] args)
  35.         {
  36.             Console.WriteLine(“Simple array of integer”);
  37.             foreach (var number in GetIntegers())
  38.                 Console.WriteLine(number.ToString());
  39.             Console.WriteLine();
  40.             Console.WriteLine(“Collection of classes”);
  41.             foreach (var myclass in GetMyNumbers())
  42.                 Console.WriteLine(myclass.PrintNumber);
  43.             Console.ReadLine();
  44.         }
  45.     }

Output

Simple array of an integer
0
1
2
3
4
5
6
7
8
9
10Collection of classes
This is no 0
This is no 1
This is no 2
This is no 3
This is no 4
This is no 5

Log4Net – Logging for .NET

Before I was thinking of rewriting my own logging for my application but after having a careful thought, I decided just to get one from NuGet package instead of reinventing the wheel. I heard a lot about Log4Net and decided to try that out. It’s really simple to get this logging up and running on your application

This is what you need to do:

1. install Log4Net from NuGet

2. Modify your web.config to add a new section and new configuration – In this case, I decided to use FileLogger. but you can have different type logger if you want (e.g event log, console, etc) or you can even build your own one that implemented ILog, this configuration allow you to create a new log file when the log file already reached the limit

Code Snippet
  1. <configSections>
  2.     <section name=log4nettype=log4net.Config.Log4NetConfigurationSectionHandler, log4net />
  3.   </configSections>
  4.   <log4net>
  5.     <root>
  6.       <levelvalue=DEBUG />
  7.       <appender-ref ref=LogFileAppender />
  8.     </root>
  9.     <appender name=LogFileAppender type=log4net.Appender.RollingFileAppender >
  10.       <param name=Filevalue=C:\\log.txt />
  11.       <param name=AppendToFilevalue=true />
  12.       <rollingStyle value=Size />
  13.       <maxSizeRollBackups value=10 />
  14.       <maximumFileSize value=10MB />
  15.       <staticLogFileName value=true />
  16.       <layout type=log4net.Layout.PatternLayout>
  17.         <param name=ConversionPattern value=%-5p%d{yyyy-MM-dd hh:mm:ss} – %m%n />
  18.       </layout>
  19.     </appender>
  20.   </log4net>

3. Code implementation – in this case I decided to register it in my global container and retrieve it later. You need to call log4net.Config.XmlConfigurator.Configure in order for Log4Net to get the settings from web.config – This is very important otherwise you will find that there is no log being generated

Code Snippet
  1. protected void Application_Start()
  2.         {
  3.             AreaRegistration.RegisterAllAreas();
  4.             RegisterGlobalFilters(GlobalFilters.Filters);
  5.             RegisterRoutes(RouteTable.Routes);
  6.             BundleTable.Bundles.RegisterTemplateBundles();
  7.             RegisterDependency();
  8.         }
  9.         #region “Dependency Injection”
  10.         private static Container Container;
  11.         public static T GetInstance<T>() where T : class
  12.         {
  13.             return Container.GetInstance<T>();
  14.         }
  15.         protected void RegisterDependency()
  16.         {
  17.             //Create a main containers
  18.             var container = new Container();
  19.             // 2. Configure the container (register)
  20.             container.RegisterPerWebRequest<IUnitOfWork>(() => new UnitOfWork(new PosDataContext()));
  21.             //Register logger
  22.             log4net.Config.XmlConfigurator.Configure();
  23.             container.Register<ILog>(() => log4net.LogManager.GetLogger(typeof(MvcApplication)));
  24.             container.Verify();
  25.             Container = container;
  26.         }
  27.         #endregion

calling the logger from my code (controller in this context)

Code Snippet
  1. public ActionResult Index()
  2.         {
  3.             ViewBag.Message = “Menu”;
  4.             MvcApplication.GetInstance<ILog>().Info(“Test Info”);
  5.             MvcApplication.GetInstance<ILog>().Error(“Test Error”);
  6.             MvcApplication.GetInstance<ILog>().Debug(“Test Debug”);
  7.             return View();
  8.         }

PS: if you want to implement your own logger, then I’d recommend you to have your logger to implement ILog interface and change it through web.config but don’t wrap/call Log4Net inside your custom logger because you don’t want to limit the rich functionality of Log4Net with your custom logger

Another tips, is when you started to add logging in your application then there should be some performance overhead eventhough it is minor. In the example below MyFunctionOutput function will still be called eventhough you disabled the logging on the config, in order to make sure the debugging code only executed

Code Snippet
  1. MvcApplication.GetInstance<ILog>().Debug(“My Function Output:” + MyFunctionOutput());

When you want to have the debug/logging omitting the log whenever the logging is enabled then you can wrap around the logging with this property (there are another properties IsErrorEnabled, IsInfoEnabled, etc)

Code Snippet
  1. if (MvcApplication.GetInstance<ILog>().IsDebugEnabled)
  2.             {
  3.                 MvcApplication.GetInstance<ILog>().Debug(“My Function Output:” + MyFunctionOutput());
  4.             }

Page 1 of 4

Powered by WordPress & Theme by Anders Norén