
In the dynamic realm of software development, the power to adapt and refine your application’s features in real-time is a game-changer. Azure Feature Manager emerges as a potent tool in this scenario, empowering developers to effortlessly toggle features on or off directly from the cloud. This comprehensive guide delves into how Azure Feature Manager can revolutionize your feature flag control, enabling seamless feature introduction, rollback capabilities, A/B testing, and tailored user experiences.
Introduction to Azure Feature Manager
Azure Feature Manager is a sophisticated component of Azure App Configuration. It offers a unified platform for managing feature flags across various environments and applications. Its capabilities extend to gradual feature rollouts, audience targeting, and seamless integration with Azure Active Directory for enhanced access control.
Step-by-Step Guide to Azure App Configuration Setup
Initiating your journey with Azure Feature Manager begins with setting up an Azure App Configuration store. Follow these steps for a smooth setup:
- Create Your Azure App Configuration: Navigate to the Azure portal and initiate a new Azure App Configuration resource. Fill in the required details and proceed with creation.
- Secure Your Access Keys: Post-creation, access the “Access keys” section under your resource settings to retrieve the connection strings, crucial for your application’s connection to the Azure App Configuration.
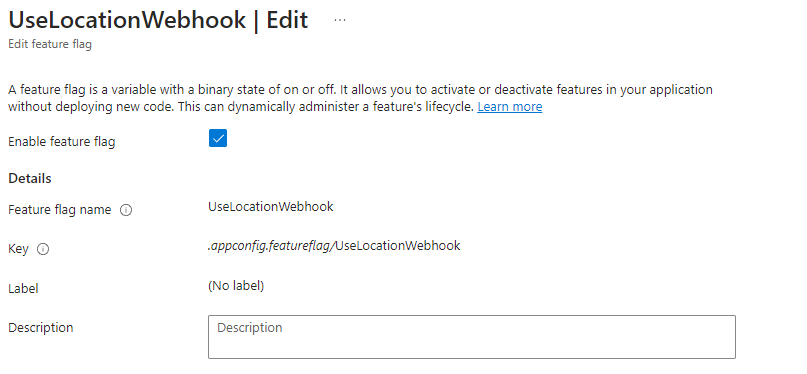
Crafting Feature Flags
To leverage feature flags in your application:
- Within the Azure App Configuration resource, click on “Feature Manager” and then “+ Add” to introduce a new feature flag.
- Identify Your Feature Flag: Name it thoughtfully, as this identifier will be used within your application to assess the flag’s status
Application Integration Essentials
Installing Required NuGet Packages
Your application necessitates specific packages for Azure integration:
Microsoft.Extensions.Configuration.AzureAppConfigurationMicrosoft.FeatureManagement.AspNetCore
These can be added via your IDE or through the command line in your project directory:
dotnet add package Microsoft.Extensions.Configuration.AzureAppConfiguration
dotnet add package Microsoft.FeatureManagement.AspNetCore
Application Configuration
Modify your appsettings.json to include your Azure App Configuration connection string:
{
  "ConnectionStrings": {
    "AppConfig": "Endpoint=https://<your-resource-name>.azconfig.io;Id=<id>;Secret=<secret>"
  }
}
Further, in Program.cs (or Startup.cs for earlier .NET versions), ensure your application is configured to utilize Azure App Configuration and activate feature management:
var builder = WebApplication.CreateBuilder(args);

builder.Configuration.AddAzureAppConfiguration(options =>
{
    options.Connect(builder.Configuration["ConnectionStrings:AppConfig"])
           .UseFeatureFlags();
});

builder.Services.AddFeatureManagement();
Implementing Feature Flags
To verify a feature flag’s status within your code:
using Microsoft.FeatureManagement;

public class FeatureService
{
    private readonly IFeatureManager _featureManager;

    public FeatureService(IFeatureManager featureManager)
    {
        _featureManager = featureManager;
    }

    public async Task<bool> IsFeatureActive(string featureName)
    {
        return await _featureManager.IsEnabledAsync(featureName);
    }
}
Advanced Implementation: Custom Targeting Filter
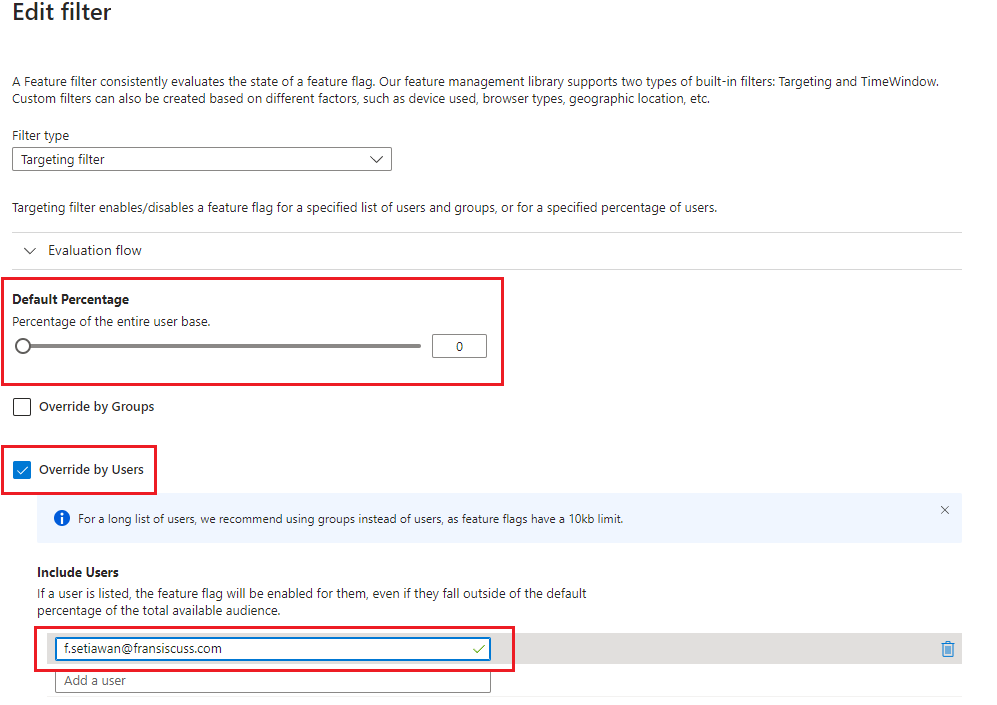
Go to Azure and modify your feature flag
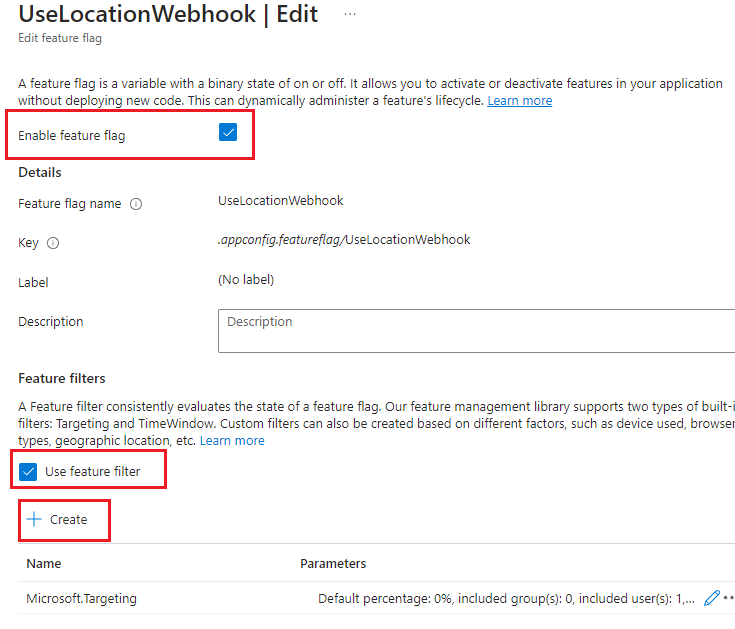
Make sure the “Default Percentage” is set to 0 and in this scenario we want to target specific user based on its email address
For user or group-specific targeting, We need to implement ITargetingContextAccessor. In below example we target based on its email address where the email address comes from JWT
using Microsoft.FeatureManagement.FeatureFilters;
using System.Security.Claims;

namespace SampleApp
{
    public class B2CTargetingContextAccessor : ITargetingContextAccessor
    {
        private const string TargetingContextLookup = "B2CTargetingContextAccessor.TargetingContext";
        private readonly IHttpContextAccessor _httpContextAccessor;

        public B2CTargetingContextAccessor(IHttpContextAccessor httpContextAccessor)
        {
            _httpContextAccessor = httpContextAccessor;
        }

        public ValueTask<TargetingContext> GetContextAsync()
        {
            HttpContext httpContext = _httpContextAccessor.HttpContext;

            //
            // Try cache lookup
            if (httpContext.Items.TryGetValue(TargetingContextLookup, out object value))
            {
                return new ValueTask<TargetingContext>((TargetingContext)value);
            }

            ClaimsPrincipal user = httpContext.User;

            //
            // Build targeting context based off user info
            TargetingContext targetingContext = new TargetingContext
            {
                UserId = user.FindFirst("http://schemas.xmlsoap.org/ws/2005/05/identity/claims/emailaddress")?.Value,
                Groups = new string[] { }
            };

            //
            // Cache for subsequent lookup
            httpContext.Items[TargetingContextLookup] = targetingContext;

            return new ValueTask<TargetingContext>(targetingContext);
        }
    }
}
in Program.cs (or Startup.cs for earlier .NET versions), modify your Feature Management to use targeting filter
builder.Services.AddFeatureManagement().WithTargeting<B2CTargetingContextAccessor>();
You also need to pass the targeting context to the feature manager
using Microsoft.FeatureManagement;

public class FeatureService
{
    private readonly IFeatureManager _featureManager;
    private readonly ITargetingContextAccessor _targetContextAccessor;

    public FeatureService(IFeatureManager featureManager, ITargetingContextAccessor targetingContextAccessor)
    {
        _featureManager = featureManager;
_targetContextAccessor = targetingContextAccessor;
    }

    public async Task<bool> IsFeatureActive()
    {
        return await _featureManager.IsEnabledAsync("UseLocationWebhook", _targetContextAccessor);
    }
}
Leave a Reply