Fransiscus Setiawan | EV Charging & Azure Solution Architect | Sydney

Technical Insights: Azure, .NET, Dynamics 365 & EV Charging Architecture

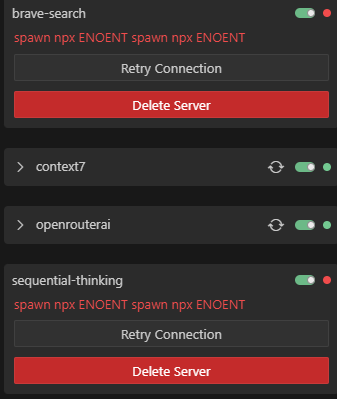
Fixing “spawn npx ENOENT” in Windows 11 When Adding MCP Server with Node/NPX

If you’re running into the error:

spawn npx ENOENT

while configuring an MCP (Multi-Context Plugin) server on Windows 11, you’re not alone. This error commonly appears when integrating tools like @upstash/context7-mcp using Node.js environments that rely on NPX, especially in cross-platform development.

This post explains:

  • What causes the “spawn npx ENOENT” error on Windows
  • The difference between two MCP server configuration methods
  • A working fix using cmd /c
  • Why this issue is specific to Windows

The Problem: “spawn npx ENOENT”

Using this configuration in your .mcprc.json or a similar setup:

{
  "mcpServers": {
    "context7": {
      "command": "npx",
      "args": ["-y", "@upstash/context7-mcp@latest"]
    }
  }
}

will cause the following error on Windows:

spawn npx ENOENT

This indicates that Node.js tried to spawn npx but couldn’t locate it in the system’s PATH.

Root Cause: Windows vs Unix Shell Behavior

On UNIX-like systems (Mac/Linux), spawn can run shell commands like npx directly. But Windows behaves differently:

  • Windows expects a .exe file to be explicitly referenced when spawning a process.
  • npx is not a native binary executable; it requires a shell to interpret and run it.
  • Node’s child_process.spawn does not invoke a shell by default unless specifically instructed.

In the failing example, the system tries to invoke npx directly as if it were a standalone executable, which doesn’t work on Windows.

The Fix: Wrapping with cmd /c

This configuration solves the issue:

{
  "context7": {
    "command": "cmd",
    "args": [
      "/c",
      "npx",
      "-y",
      "@upstash/context7-mcp@latest"
    ]
  }
}

Explanation

  • "cmd" invokes the Windows Command Prompt.
  • "/c" tells the shell to execute the command that follows.
  • The rest of the line (npx -y @upstash/context7-mcp@latest) is interpreted and executed properly by the shell.

This ensures that npx is resolved correctly and executed within a compatible environment.

Technical Comparison

Configuration Style Works on Windows? Shell Used? Reason
"command": "npx" No No Tries to execute npx directly without shell
"command": "cmd", "args": ["/c", "npx", ...] Yes Yes Executes the command within the Windows shell, allowing proper resolution

Best Practices

When using Node.js-based CLI tools across platforms:

  • Wrap shell commands using cmd /c (Windows) or sh -c (Unix)
  • Avoid assuming that commands like npx are executable as binaries
  • Test your scripts in both Windows and Unix environments when possible

Conclusion

If you’re encountering the spawn npx ENOENT error when configuring MCP servers on Windows 11, the fix is straightforward: use cmd /c to ensure shell interpretation. This small change ensures compatibility and prevents runtime errors across different operating systems.

OCPP 1.6: The Unsung Hero Powering Your EV Charge (But It’s Getting a Major Upgrade!) – A Deep Dive

Ever pulled up to a charging station, plugged in, and watched your electric vehicle magically start to juice up? That seamless experience isn’t magic; it’s the result of a communication protocol called OCPP – the Open Charge Point Protocol. And for a significant chapter in the EV revolution, version 1.6 was the quiet workhorse behind the scenes, ensuring smooth communication between your car and the charging infrastructure. Think of it as the universal translator that made charging stations and management systems speak the same language.

Why Should You Care About OCPP 1.6? (Even If “Protocol” Sounds Like Tech Jargon)

Let’s be honest, “protocol” doesn’t exactly scream excitement. But here’s why OCPP 1.6 mattered, and why it’s worth a quick chat:

  • Charging Anywhere, Anytime: Imagine if your phone only worked with certain cell towers. Chaos, right? OCPP 1.6 prevented that in the EV world. It meant you could plug into a wider range of chargers, regardless of who made them or managed them.
  • Remote Control for Operators: Think of charging station operators as air traffic controllers for electricity. OCPP 1.6 gave them the ability to monitor, control, and update stations remotely. This meant faster fixes, better service, and even dynamic pricing adjustments.
  • Data-Driven Optimization: OCPP 1.6 allowed for the collection of valuable data on charging patterns. This data helped operators understand usage, optimize pricing, and improve the overall charging experience.

Taking a Slightly Deeper Dive (But Still Keeping it Real)

So, how did this “universal translator” actually work? It broke down charging tasks into manageable “profiles,” like departments in a well-organized company:

  • Core Profile: The Front Desk: This is where the basic interactions happened: verifying user IDs, starting and stopping charging sessions, and reporting energy usage. Messages like Authorize, BootNotification, and MeterValues handled these crucial tasks.
  • Firmware Management: The IT Department: Keeping charging stations up-to-date is vital for security and functionality. This profile allowed for remote firmware updates, ensuring stations were running the latest software.
  • Local Authorization List: The Offline Backup: Ever lose internet connection? This profile allowed charging to continue even when the network was down, using a local list of authorized users.
  • Reservation Profile: The Booking System: This allowed users to reserve charging slots, ensuring a spot was available when needed.
  • Smart Charging Profile: The Energy Optimizer: This profile enabled dynamic energy management, balancing grid load and optimizing charging schedules.
  • Remote Trigger Profile: The On-Demand Information Request: This allowed the central system to request specific data from the charging station whenever needed.

Understanding Message Structure: JSON (OCPP-J)

Since JSON is the more prevalent format in OCPP 1.6, let’s focus on that. Remember, JSON messages are structured as arrays with four key elements:

  1. MessageTypeId: Indicates the message type (2 = CALL, 3 = CALLRESULT, 4 = CALLERROR).
  2. UniqueId: Matches requests and responses.
  3. Action: The OCPP message name (e.g., “Authorize,” “MeterValues”).
  4. Payload: The message’s data in JSON object format.

Example Messages:

  1. Authorize Request (CALL):
    • [ 2, “12345”, “Authorize”, { “idTag”: “ABCDEF1234567890” } ]
  2. Authorize Response (CALLRESULT):
    • [ 3, “12345”, “Authorize”, { “idTagInfo”: { “status”: “Accepted” } } ]
  3. MeterValues Request (CALL):
    • [ 2, “67890”, “MeterValues”, { “connectorId”: 1, “transactionId”: 9876, “meterValue”: [ { “timestamp”: “2024-10-27T10:00:00Z”, “sampledValue”: [ { “value”: “1234”, “unit”: “Wh”, “measurand”: “Energy.Active.Import.Register” } ] } ] } ]
  4. StatusNotification Request (CALL):
    • [ 2, “13579”, “StatusNotification”, { “connectorId”: 1, “status”: “Charging”, “timestamp”: “2024-10-27T10:05:00Z” } ]

OCPP 1.6 Message Rundown:

Here’s a quick overview of all the messages in OCPP 1.6, organized by profile:

Core Profile:

  • Authorize: Checks user authorization.
  • BootNotification: Charge Point sends upon startup.
  • ChangeAvailability: Sets Charge Point/connector availability.
  • ChangeConfiguration: Modifies Charge Point configuration.
  • ClearCache: Clears local authorization cache.
  • DataTransfer: Vendor-specific data exchange.
  • GetConfiguration: Retrieves Charge Point configuration.
  • Heartbeat: Charge Point sends to indicate online status.
  • MeterValues: Reports energy consumption.
  • RemoteStartTransaction/RemoteStopTransaction: Remote charging control.
  • Reset: Reboots the Charge Point.
  • StartTransaction: Charge Point sends at charging start.
  • StatusNotification: Reports Charge Point status.
  • StopTransaction: Charge Point sends at charging end.
  • UnlockConnector: Remote connector release.

Firmware Management Profile:

  • GetDiagnostics: Requests diagnostic logs.
  • DiagnosticsStatusNotification: Reports diagnostic log upload status.
  • FirmwareStatusNotification: Reports firmware update status.
  • UpdateFirmware: Initiates firmware update.

Local Authorization List Management Profile:

  • GetLocalListVersion: Checks local list version.
  • SendLocalList: Updates local authorization list.

Reservation Profile:

  • ReserveNow: Requests a reservation.
  • CancelReservation: Cancels a reservation.

Smart Charging Profile:

  • SetChargingProfile: Sets charging schedules/limits.
  • ClearChargingProfile: Removes charging profiles.
  • GetCompositeSchedule: Requests active charging schedule.

Remote Trigger Profile:

  • TriggerMessage: Requests specific messages from Charge Point.

Security: The Silent Guardian (And Where We Need to Step Up)

Security is paramount in the EV world. After all, we’re dealing with sensitive data and high-voltage electricity. OCPP 1.6 incorporated:

  • TLS Encryption: The Secure Tunnel: This encrypted communication between charging stations and management systems, protecting data from unauthorized access.
  • Authentication Mechanisms: The ID Check: This verified the identity of users and devices, ensuring only authorized parties could access the charging infrastructure.
  • Secure Firmware Updates: The Software Integrity Check: This ensured that firmware updates were legitimate and not malicious software.

However, OCPP 1.6 wasn’t perfect. Some of the older security methods, like basic username/password authentication, were vulnerable to attacks. And vulnerabilities regarding how messages were handled, have been discovered.

The Future is Here: OCPP 2.0.1 and Beyond – A Necessary Evolution

While OCPP 1.6 served its purpose, the EV landscape is rapidly evolving. That’s why we’re seeing the rise of OCPP 2.0.1 and OCPP 2.1 – a major upgrade in terms of features and security:

  • Enhanced Device Management: More granular control and monitoring of charging stations.
  • Stronger Security Protocols: Advanced encryption, certificate-based authentication, and defined security profiles.
  • Advanced Smart Charging Capabilities: Integration with energy management systems, dynamic load balancing, and support for ISO 15118.
  • Native ISO 15118 Support: Enabling features like “Plug & Charge,” where EVs can automatically authenticate and charge without user intervention.
  • Bidirectional Charging (V2G/V2X): Enabling EVs to send power back to the grid, transforming them into mobile energy storage units.
  • Improved Error Handling and Data Compression: Making the system more robust and efficient.

The Human Takeaway: Embracing the Future of EV Charging

OCPP 1.6 was a crucial stepping stone in the EV revolution, laying the foundation for interoper

What is OCPP? A Complete Guide to the EV Charging Communication Protocol

As electric vehicles (EVs) become more mainstream, the infrastructure that powers them is evolving rapidly. Behind the scenes of every public EV charger is a smart communication layer that ensures chargers operate efficiently, securely, and interoperably. That communication standard is called OCPP — Open Charge Point Protocol.

In this article, we’ll break down what OCPP is, why it matters, how it works, and the different versions available today. Whether you’re an EV driver, charging network operator, or tech enthusiast, this guide will help you understand how OCPP is shaping the future of electric mobility.

🔌 What is OCPP?

OCPP (Open Charge Point Protocol) is an application protocol used to enable communication between Electric Vehicle Supply Equipment (EVSE)—commonly known as EV chargers—and a Central Management System (CMS), often referred to as a Charge Point Operator (CPO) backend.

It is vendor-neutral and open-source, developed by the Open Charge Alliance (OCA) to standardize how EV chargers and management systems talk to each other.

Think of OCPP as the universal “language” between the charging station and the software that manages it.

⚙️ How OCPP Works

OCPP defines a set of WebSocket-based or SOAP-based messages that are exchanged between the client (charge point) and the server (backend system).

For example:

  • When a driver plugs in their EV, the charger sends a StartTransaction message to the backend.
  • The backend authenticates the session and sends a StartTransactionConfirmation.
  • Once charging ends, the charger sends a StopTransaction message.

Other key message types include:

  • Heartbeat: to ensure the charger is online
  • StatusNotification: to report charger availability
  • BootNotification: sent when the charger powers up
  • MeterValues: for usage data and billing
  • FirmwareUpdate, Diagnostics, and RemoteStart/Stop commands

These interactions enable remote control, monitoring, diagnostics, and software updates — all of which are essential for smart charging infrastructure.

🚀 Why is OCPP Important?

  • Interoperability: OCPP allows chargers from different manufacturers to connect to any compliant backend, reducing vendor lock-in.
  • Scalability: Operators can manage thousands of chargers efficiently using a single system.
  • Smart Charging: OCPP supports load balancing, grid integration, and energy optimization.
  • Security: Latest versions support enhanced encryption, authentication, and access control mechanisms.

OCPP is especially important for public EV charging networks, fleet operators, municipalities, and utility companies that require flexibility and operational efficiency.

🔢 OCPP Versions Explained

Over the years, OCPP has evolved to meet the growing demands of EV infrastructure. Here’s a look at its major versions:

OCPP 1.2 (2009)

  • The first version
  • Limited functionality
  • Largely outdated and no longer used

OCPP 1.5

  • Improved stability
  • Better message structure
  • Still lacks advanced features

OCPP 1.6 (2015)

  • Most widely deployed version
  • Supports JSON over WebSocket and SOAP
  • Adds:
    • Remote Start/Stop
    • Smart Charging (Load Profiles)
    • Firmware Management
    • Diagnostics
  • Still supported by most major networks today

OCPP 2.0 (2018)

  • Major overhaul of the protocol
  • Adds:
    • Device Management
    • Security Profiles
    • ISO 15118 integration (Plug & Charge)
    • Improved Smart Charging
    • Better data modeling

OCPP 2.0.1 (2020)

  • The latest and stable version
  • Focused on bug fixes and practical enhancements from real-world implementations
  • Growing adoption in next-generation networks

📝 Note: OCPP 2.x is not backward compatible with 1.6, but many platforms support dual-stack operation.

🛠️ Technical Architecture Overview

A typical OCPP-based EV charging setup consists of:

  1. Charge Point (Client):
    • Hardware installed at EV charging stations
    • Acts as the OCPP client
    • Initiates communication
  2. Central System (Server):
    • Backend system that processes OCPP messages
    • Manages user sessions, pricing, diagnostics, and energy usage
  3. Communication Layer:
    • Typically uses WebSockets over TLS for secure, real-time, full-duplex communication
    • Some older implementations use SOAP over HTTP
  4. Optional Add-ons:
    • Token authentication (RFID, app-based)
    • OCPI/OSCP/ISO 15118 integration for roaming and advanced smart grid features

🔒 Security in OCPP

Starting with OCPP 2.0, the protocol includes support for secure communication profiles, including:

  • TLS Encryption
  • Client-side and server-side certificates
  • Secure firmware updates
  • Signed metering and transaction data

These features make OCPP ready for enterprise-scale, mission-critical deployments.

🌍 Real-World Use Cases

  • Public Charging Networks: Roaming across different charger brands
  • Fleet Management: Real-time diagnostics and energy consumption tracking
  • Retail Sites & Fuel Stations: Revenue tracking and load optimization
  • Smart Cities & Utilities: Demand response and grid integration

📈 Final Thoughts

OCPP is the backbone of modern EV charging infrastructure. As the electric vehicle ecosystem expands, having a universal, open, and future-ready protocol like OCPP ensures that EV charging remains reliable, scalable, and secure.

Whether you’re deploying 5 chargers in a parking lot or 5,000 across a city, OCPP gives you the flexibility to choose the hardware and software that suit your needs — all while ensuring interoperability with the rest of the EV ecosystem.

Want to learn more about OCPP, EV charging, or smart infrastructure? Follow this blog for future deep-dives, comparisons, and real-world implementation guides!

Scraping JSON-LD from a Next.js Site with Crawl4AI: My Debugging Journey

Scraping data from modern websites can feel like a puzzle, especially when they’re built with Next.js and all that fancy JavaScript magic. Recently, I needed to pull some product info—like names, prices, and a few extra details—from an e-commerce page that was giving me a headache. The site (let’s just call it https://shop.example.com/products/[hidden-stuff]) used JSON-LD tucked inside a <script> tag, but my first attempts with Crawl4AI came up empty. Here’s how I cracked it, step by step, and got the data I wanted.

The Headache: Empty Results from a Next.js Page

I was trying to grab details from a product page—think stuff like the item name, description, member vs. non-member prices, and some category info. The JSON-LD looked something like this (I’ve swapped out the real details for a fake example):

{
  "@context": "https://schema.org",
  "@type": "Product",
  "name": "Beginner’s Guide to Coffee Roasting",
  "description": "Learn the basics of roasting your own coffee beans at home. Recorded live last summer.",
  "provider": {
    "@type": "Organization",
    "name": "Bean Enthusiast Co."
  },
  "offers": [
    {"@type": "Offer", "price": 49.99, "priceCurrency": "USD"},
    {"@type": "Offer", "price": 59.99, "priceCurrency": "USD"}
  ],
  "skillLevel": "Beginner",
  "hasWorkshop": [
    {
      "@type": "WorkshopInstance",
      "deliveryMethod": "Online",
      "workshopSchedule": {"startDate": "2024-08-15"}
    }
  ]
}

My goal was to extract this, label the cheaper price as “member” and the higher one as “non-member,” and snag extras like skillLevel and deliveryMethod. Simple, right? Nope. My first stab at it with Crawl4AI gave me nothing—just an empty [].

What Went Wrong: Next.js Threw Me a Curveball

Next.js loves doing things dynamically, which means the JSON-LD I saw in my browser’s dev tools wasn’t always in the raw HTML Crawl4AI fetched. I started with this basic setup:

from crawl4ai import AsyncWebCrawler
from crawl4ai.extraction_strategy import JsonCssExtractionStrategy

schema = {
    "name": "Product Schema",
    "baseSelector": "script[type='application/ld+json']",
    "fields": [{"name": "json_ld_content", "selector": "script[type='application/ld+json']", "type": "text"}]
}

async def extract_data(url):
    async with AsyncWebCrawler() as crawler:
        result = await crawler.arun(url=url, extraction_strategy=JsonCssExtractionStrategy(schema))
        extracted_data = json.loads(result.extracted_content)
        print(extracted_data)

# Output: []

Empty. Zilch. I dug into the debug output and saw the JSON-LD was in result.html, but result.extracted_content was blank. Turns out, Next.js was injecting that <script> tag after the page loaded, and Crawl4AI wasn’t catching it without some extra nudging.

How I Fixed It: A Workaround That Worked

After banging my head against the wall, I figured out I needed to make Crawl4AI wait for the JavaScript to do its thing and then grab the JSON-LD myself from the HTML. Here’s the code that finally worked:

import json
import asyncio
from crawl4ai import AsyncWebCrawler

async def extract_product_schema(url):
    async with AsyncWebCrawler(verbose=True, user_agent="Mozilla/5.0") as crawler:
        print(f"Checking out: {url}")
        result = await crawler.arun(
            url=url,
            js_code=[
                "window.scrollTo(0, document.body.scrollHeight);",  # Wake up the page
                "await new Promise(resolve => setTimeout(resolve, 5000));"  # Give it 5 seconds
            ],
            bypass_cache=True,
            timeout=30
        )

        if not result.success:
            print(f"Oops, something broke: {result.error_message}")
            return None

        # Digging into the HTML myself
        html = result.html
        start_marker = '<script type="application/ld+json">'
        end_marker = '</script>'
        start_idx = html.find(start_marker) + len(start_marker)
        end_idx = html.find(end_marker, start_idx)

        if start_idx == -1 or end_idx == -1:
            print("Couldn’t find the JSON-LD.")
            return None

        json_ld_raw = html[start_idx:end_idx].strip()
        json_ld = json.loads(json_ld_raw)

        # Sorting out the product details
        if json_ld.get("@type") == "Product":
            offers = sorted(
                [{"price": o.get("price"), "priceCurrency": o.get("priceCurrency")} for o in json_ld.get("offers", [])],
                key=lambda x: x["price"]
            )
            workshop_instances = json_ld.get("hasWorkshop", [])
            schedule = workshop_instances[0].get("workshopSchedule", {}) if workshop_instances else {}
            
            product_info = {
                "name": json_ld.get("name"),
                "description": json_ld.get("description"),
                "providerName": json_ld.get("provider", {}).get("name"),
                "memberPrice": offers[0] if offers else None,
                "nonMemberPrice": offers[-1] if offers else None,
                "skillLevel": json_ld.get("skillLevel"),
                "deliveryMethod": workshop_instances[0].get("deliveryMethod") if workshop_instances else None,
                "startDate": schedule.get("startDate")
            }
            return product_info
        print("No product data here.")
        return None

async def main():
    url = "https://shop.example.com/products/[hidden-stuff]"
    product_data = await extract_product_schema(url)
    if product_data:
        print("Here’s what I got:")
        print(json.dumps(product_data, indent=2))

if __name__ == "__main__":
    asyncio.run(main())

What I Got Out of It

{
  "name": "Beginner’s Guide to Coffee Roasting",
  "description": "Learn the basics of roasting your own coffee beans at home. Recorded live last summer.",
  "providerName": "Bean Enthusiast Co.",
  "memberPrice": {
    "price": 49.99,
    "priceCurrency": "USD"
  },
  "nonMemberPrice": {
    "price": 59.99,
    "priceCurrency": "USD"
  },
  "skillLevel": "Beginner",
  "deliveryMethod": "Online",
  "startDate": "2024-08-15"
}

How I Made It Work

Waiting for JavaScript: I told Crawl4AI to scroll and hang out for 5 seconds with js_code. That gave Next.js time to load everything up.DIY Parsing: The built-in extractor wasn’t cutting it, so I searched the HTML for the <script> tag and pulled the JSON-LD out myself.Price Tags: Sorted the prices and called the lowest “member” and the highest “non-member”—seemed like a safe bet for this site.

What I Learned Along the Way

  • Next.js is Tricky: It’s not just about the HTML you get—it’s about what shows up after the JavaScript runs. Timing is everything.
  • Sometimes You Gotta Get Hands-On: When the fancy tools didn’t work, digging into the raw HTML saved me.
  • Debugging Pays Off: Printing out the HTML and extractor output showed me exactly where things were going wrong.

Azure Service Bus Peek-Lock: A Comprehensive Guide to Reliable Message Processing

Working with Peek-Lock in Azure Service Bus: A Practical Guide

In many distributed systems, reliable message handling is a top priority. When I first started building an order processing application, I learned very quickly that losing even one message could cause major headaches. That’s exactly where Azure Service Bus and its Peek-Lock mode came to the rescue. By using Peek-Lock, you don’t remove the message from the queue as soon as you receive it. Instead, you lock it for a certain period, process it, and then decide what to do next—complete, abandon, dead-letter, or defer. Here’s how it all fits together.

Why Peek-Lock Matters

Peek-Lock is one of the two receiving modes offered by Azure Service Bus. The other is Receive and Delete, which automatically removes messages from the queue upon receipt. While that might be fine for scenarios where occasional message loss is acceptable, many real-world applications need stronger guarantees.

  1. Reliability: With Peek-Lock, if processing fails, you can abandon the message. This makes it visible again for another attempt, reducing the risk of data loss.
  2. Explicit Control: You decide when a message is removed. After you successfully handle the message (e.g., update a database or complete a transaction), you explicitly mark it as complete.
  3. Error Handling: If the same message repeatedly fails, you can dead-letter it for investigation. This helps avoid getting stuck in an endless processing loop.

What Happens If the Lock Expires?

By default, the lock is held for a certain period (often 30 seconds, which can be adjusted). If your code doesn’t complete or abandon the message before the lock expires, the message becomes visible to other receivers. To handle potentially lengthy processes, you can renew the lock programmatically, although that introduces additional complexity. The key takeaway is that you should design your service to either complete or abandon messages quickly, or renew the lock if more time is truly necessary.

Default Peek-Lock in Azure Functions

When you use Azure Service Bus triggers in Azure Functions, you generally don’t need to configure or manage the Peek-Lock behavior yourself. According to the official documentation, the default behavior in Azure Functions is already set to Peek-Lock. This means you can focus on your function’s core logic without explicitly dealing with message locking or completion in most scenarios.

Don’t Swallow Exceptions

One important detail to note is that in Azure Functions, any unhandled exceptions in your function code will signal to the runtime that message processing failed. This prevents the function from automatically completing the message, allowing the Service Bus to retry later. However, if you wrap your logic in a try/catch block and inadvertently swallow the exception—meaning you catch the error without rethrowing or handling it properly—you might unintentionally signal success. That would lead to the message being completed even though a downstream service might have failed.

Recommendation:

  • If you must use a try/catch, make sure errors are re-thrown or handled in a way that indicates failure if the message truly hasn’t been processed successfully. Otherwise, you’ll end up completing the message and losing valuable information about the error.

Typical Use Cases

  1. Financial Transactions: Losing a message that represents a monetary transaction is not an option. Peek-Lock ensures messages remain available until your code confirms it was successfully processed.
  2. Critical Notifications: If you have an alerting system that notifies users about important events, you don’t want those notifications disappearing in case of a crash.
  3. Order Processing: In ecommerce or supply chain scenarios, every order message has to be accounted for. Peek-Lock helps avoid partial or lost orders due to transient errors.

Example in C#

Here’s a short snippet that demonstrates how you can receive messages in Peek-Lock mode using the Azure.Messaging.ServiceBus library:

using System;
using System.Threading.Tasks;
using Azure.Messaging.ServiceBus;

public class PeekLockExample
{
    private const string ConnectionString = "<YOUR_SERVICE_BUS_CONNECTION_STRING>";
    private const string QueueName = "<YOUR_QUEUE_NAME>";

    public async Task RunPeekLockSample()
    {
        // Create a Service Bus client
        var client = new ServiceBusClient(ConnectionString);

        // Create a receiver in Peek-Lock mode
        var receiver = client.CreateReceiver(
            QueueName, 
            new ServiceBusReceiverOptions 
            { 
                ReceiveMode = ServiceBusReceiveMode.PeekLock 
            }
        );

        try
        {
            // Attempt to receive a single message
            ServiceBusReceivedMessage message = await receiver.ReceiveMessageAsync(TimeSpan.FromSeconds(10));

            if (message != null)
            {
                // Process the message
                string body = message.Body.ToString();
                Console.WriteLine($"Processing message: {body}");

                // If processing is successful, complete the message
                await receiver.CompleteMessageAsync(message);
                Console.WriteLine("Message completed and removed from the queue.");
            }
            else
            {
                Console.WriteLine("No messages were available to receive.");
            }
        }
        catch (Exception ex)
        {
            Console.WriteLine($"An error occurred: {ex.Message}");
            // Optionally handle or log the exception
        }
        finally
        {
            // Clean up resources
            await receiver.CloseAsync();
            await client.DisposeAsync();
        }
    }
}

What’s Happening Here?

  • We create a ServiceBusClient to connect to Azure Service Bus.
  • We specify ServiceBusReceiveMode.PeekLock when creating the receiver.
  • The code then attempts to receive one message and processes it.
  • If everything goes smoothly, we call CompleteMessageAsync to remove it from the queue. If something goes wrong, the message remains locked until the lock expires or until we choose to abandon it.

Final Thoughts

Peek-Lock strikes a balance between reliability and performance. It ensures you won’t lose critical data while giving you the flexibility to handle errors gracefully. Whether you’re dealing with financial operations, critical user notifications, or any scenario where each message must be processed correctly, Peek-Lock is an indispensable tool in your Azure Service Bus arsenal.

In Azure Functions, you get this benefit without having to manage the locking details, so long as you don’t accidentally swallow your exceptions. For other applications, adopting Peek-Lock might demand a bit more coding, but it’s well worth it if you need guaranteed, at-least-once message delivery.

Whether you’re building a simple queue-based workflow or a complex event-driven system, Peek-Lock ensures your messages remain safe until you decide they’re processed successfully. It’s a powerful approach that balances performance with reliability, which is why it’s a must-know feature for developers relying on Azure Service Bus.

Microsoft Azure Service Bus Exception: “Cannot allocate more handles. The maximum number of handles is 4999”

When working with Microsoft Azure Service Bus, you may encounter the following exception:

“Cannot allocate more handles. The maximum number of handles is 4999.”

This issue typically arises due to improper dependency injection scope configuration for the ServiceBusClient. In most cases, the ServiceBusClient is registered as Scoped instead of Singleton, leading to the creation of multiple instances during the application lifetime, which exhausts the available handles.

In this blog post, we’ll explore the root cause and demonstrate how to fix this issue by using proper dependency injection in .NET applications.

Understanding the Problem

Scoped vs. Singleton

  1. Scoped: A new instance of the service is created per request.
  2. Singleton: A single instance of the service is shared across the entire application lifetime.

The ServiceBusClient is designed to be a heavyweight object that maintains connections and manages resources efficiently. Hence, it should be registered as a Singleton to avoid excessive resource allocation and ensure optimal performance.

Before Fix: Using Scoped Registration

Here’s an example of the problematic configuration:

public void ConfigureServices(IServiceCollection services)
{
    services.AddScoped(serviceProvider =>
    {
        string connectionString = Configuration.GetConnectionString("ServiceBus");
        return new ServiceBusClient(connectionString);
    });

    services.AddScoped<IMessageProcessor, MessageProcessor>();
}

In this configuration:

  • A new instance of ServiceBusClient is created for each HTTP request or scoped context.
  • This quickly leads to resource exhaustion, causing the “Cannot allocate more handles” error.

Solution: Switching to Singleton

To fix this, register the ServiceBusClient as a Singleton, ensuring a single instance is shared across the application lifetime:

public void ConfigureServices(IServiceCollection services)
{
    services.AddSingleton(serviceProvider =>
    {
        string connectionString = Configuration.GetConnectionString("ServiceBus");
        return new ServiceBusClient(connectionString);
    });

    services.AddScoped<IMessageProcessor, MessageProcessor>();
}

In this configuration:

  • A single instance of ServiceBusClient is created and reused for all requests.
  • Resource usage is optimized, and the exception is avoided.

Sample Code: Before and After

Before Fix (Scoped Registration)

public interface IMessageProcessor
{
    Task ProcessMessageAsync();
}

public class MessageProcessor : IMessageProcessor
{
    private readonly ServiceBusClient _client;

    public MessageProcessor(ServiceBusClient client)
    {
        _client = client;
    }

    public async Task ProcessMessageAsync()
    {
        ServiceBusReceiver receiver = _client.CreateReceiver("queue-name");
        var message = await receiver.ReceiveMessageAsync();
        Console.WriteLine($"Received message: {message.Body}");
        await receiver.CompleteMessageAsync(message);
    }
}

After Fix (Singleton Registration)

public void ConfigureServices(IServiceCollection services)
{
    // Singleton registration for ServiceBusClient
    services.AddSingleton(serviceProvider =>
    {
        string connectionString = Configuration.GetConnectionString("ServiceBus");
        return new ServiceBusClient(connectionString);
    });

    services.AddScoped<IMessageProcessor, MessageProcessor>();
}

public class MessageProcessor : IMessageProcessor
{
    private readonly ServiceBusClient _client;

    public MessageProcessor(ServiceBusClient client)
    {
        _client = client;
    }

    public async Task ProcessMessageAsync()
    {
        ServiceBusReceiver receiver = _client.CreateReceiver("queue-name");
        var message = await receiver.ReceiveMessageAsync();
        Console.WriteLine($"Received message: {message.Body}");
        await receiver.CompleteMessageAsync(message);
    }
}

Key Takeaways

  1. Always use Singleton scope for ServiceBusClient to optimize resource usage.
  2. Avoid using Scoped or Transient scope for long-lived, resource-heavy objects.
  3. Test your application under load to ensure no resource leakage occurs.

Resolving the “Certificate Chain Was Issued by an Authority That Is Not Trusted” Error During Sitecore Installation on Windows 11

When installing Sitecore on Windows 11, you might encounter the following error:

A connection was successfully established with the server, but then an error occurred during the login process. (provider: SSL Provider, error: 0 - The certificate chain was issued by an authority that is not trusted.)

This issue arises due to a recent security enforcement rolled out by Microsoft. Windows 11 now requires SQL Server connections to use encrypted connections by default. Some of the PowerShell scripts used during the Sitecore installation process are not configured to handle this change, resulting in the above error.

In this blog post, we’ll dive into the root cause of the issue and walk you through the steps to resolve it.


Understanding the Root Cause

The error is triggered because the PowerShell scripts used in the Sitecore installation attempt to connect to the SQL Server without explicitly trusting the server’s SSL certificate. With the new security enforcement, connections to the SQL Server default to encryption, but without a trusted certificate, the connection fails.

This is particularly relevant when using self-signed certificates or development environments where the SQL Server’s certificate authority is not inherently trusted.

How to Fix the Error

The solution is to explicitly configure the Sitecore installation scripts to trust the SQL Server’s certificate by setting the TrustServerCertificate variable to true. This needs to be done in two specific JSON files used during the installation process:

  1. sitecore-xp0.json
  2. xconnect-xp0.json

Steps to Resolve

  1. Locate the JSON Files:
    • Navigate to the folder where you extracted the Sitecore installation files.
    • Open the ConfigurationFiles directory (or equivalent, depending on your setup).
    • Find the sitecore-xp0.json and xconnect-xp0.json files.
  2. Modify the JSON Files:
    • Open sitecore-xp0.json in a text editor (e.g., Visual Studio Code or Notepad++).
    • Look for [variable('Sql.Credential')] in the JSON structure.
    • Add the following key-value pair:"TrustServerCertificate": true
    • Example:
"CreateShardApplicationDatabaseServerLoginInvokeSqlCmd": {
    "Description": "Create Collection Shard Database Server Login.",
    "Type": "InvokeSqlcmd",
    "Params": {
        "ServerInstance": "[parameter('SqlServer')]",
        "Credential": "[variable('Sql.Credential')]",
        "TrustServerCertificate": true,
        "InputFile": "[variable('Sharding.SqlCmd.Path.CreateShardApplicationDatabaseServerLogin')]",
        "Variable": [
            "[concat('UserName=',variable('SqlCollection.User'))]",
            "[concat('Password=',variable('SqlCollection.Password'))]"
        ]
    },
    "Skip": "[or(parameter('SkipDatabaseInstallation'),parameter('Update'))]"
},
"CreateShardManagerApplicationDatabaseUserInvokeSqlCmd": {
    "Description": "Create Collection Shard Manager Database User.",
    "Type": "InvokeSqlcmd",
    "Params": {
        "ServerInstance": "[parameter('SqlServer')]",
        "Credential": "[variable('Sql.Credential')]",
        "TrustServerCertificate": true,
        "Database": "[variable('Sql.Database.ShardMapManager')]",
        "InputFile": "[variable('Sharding.SqlCmd.Path.CreateShardManagerApplicationDatabaseUser')]",
        "Variable": [
            "[concat('UserName=',variable('SqlCollection.User'))]",
            "[concat('Password=',variable('SqlCollection.Password'))]"
        ]
    },
    "Skip": "[or(parameter('SkipDatabaseInstallation'),parameter('Update'))]"
}
  • Repeat the same modification for the xconnect-xp0.json file.
  • Save and Retry Installation:
    • Save both JSON files after making the changes.
  • Re-run the Sitecore installation PowerShell script.

    Additional Notes

    • Security Considerations: Setting TrustServerCertificate to true is a quick fix for development environments. However, for production environments, it’s recommended to install a certificate from a trusted Certificate Authority (CA) on the SQL Server to ensure secure and trusted communication.
    • Error Still Persists?: Double-check the JSON modifications and ensure the SQL Server is accessible from your machine. If issues persist, verify firewall settings and SQL Server configuration.

    Conclusion

    The “Certificate chain was issued by an authority that is not trusted” error during Sitecore installation is a direct result of Microsoft’s enhanced security measures in Windows 11. By updating the Sitecore configuration files to include the TrustServerCertificate setting, you can bypass this error and complete the installation successfully.

    For a smoother experience in production environments, consider implementing a properly signed SSL certificate for your SQL Server.

    If you’ve encountered similar issues or have additional tips, feel free to share them in the comments below!

    Sending Apple Push Notification for Live Activities Using .NET

    In the evolving world of app development, ensuring real-time engagement with users is crucial. Apple Push Notification Service (APNs) enables developers to send notifications to iOS devices, and with the introduction of Live Activities in iOS, keeping users updated about ongoing tasks is easier than ever. This guide demonstrates how to use .NET to send Live Activity push notifications using APNs.

    Prerequisites

    Before diving into the code, ensure you have the following:

    1. Apple Developer Account with access to APNs.
    2. P8 Certificate downloaded from the Apple Developer Portal.
    3. Your Team ID, Key ID, and Bundle ID of the iOS application.
    4. .NET SDK installed on your system.

    Overview of the Code

    The provided ApnsService class encapsulates the logic to interact with APNs for sending push notifications, including Live Activities. Let’s break it down step-by-step:

    1. Initializing APNs Service

    The constructor sets up the base URI for APNs:

    • Use https://api.push.apple.com for production.
    • Use https://api.development.push.apple.com for the development environment.
    _httpClient = new HttpClient { BaseAddress = new Uri("https://api.development.push.apple.com:443") };

    2. Generating the JWT Token

    APNs requires a JWT token for authentication. This token is generated using:

    • Team ID: Unique identifier for your Apple Developer account.
    • Key ID: Associated with the P8 certificate.
    • ES256 Algorithm: Uses the private key in the P8 certificate to sign the token.
    private string GetProviderToken()
    {
        double epochNow = (int)DateTime.UtcNow.Subtract(new DateTime(1970, 1, 1)).TotalSeconds;
        Dictionary<string, object> payload = new Dictionary<string, object>
        {
            { "iss", _teamId },
            { "iat", epochNow }
        };
        var extraHeaders = new Dictionary<string, object>
        {
            { "kid", _keyId },
            { "alg", "ES256" }
        };
    
        CngKey privateKey = GetPrivateKey();
    
        return JWT.Encode(payload, privateKey, JwsAlgorithm.ES256, extraHeaders);
    }

    3. Loading the Private Key

    The private key is extracted from the .p8 file using BouncyCastle.

    private CngKey GetPrivateKey()
    {
        using (var reader = File.OpenText(_p8CertificateFileLocation))
        {
            ECPrivateKeyParameters ecPrivateKeyParameters = (ECPrivateKeyParameters)new PemReader(reader).ReadObject();
            var x = ecPrivateKeyParameters.Parameters.G.AffineXCoord.GetEncoded();
            var y = ecPrivateKeyParameters.Parameters.G.AffineYCoord.GetEncoded();
            var d = ecPrivateKeyParameters.D.ToByteArrayUnsigned();
    
            return EccKey.New(x, y, d);
        }
    }

    4. Sending the Notification

    The SendApnsNotificationAsync method handles:

    • Building the request with headers and payload.
    • Adding apns-push-type as liveactivity for Live Activity notifications.
    • Adding a unique topic for Live Activities by appending .push-type.liveactivity to the Bundle ID.
    public async Task SendApnsNotificationAsync<T>(string deviceToken, string pushType, T payload) where T : class
        {
            var jwtToken = GetProviderToken();
            var jsonPayload = JsonSerializer.Serialize(payload);
            // Prepare HTTP request
            var request = new HttpRequestMessage(HttpMethod.Post, $"/3/device/{deviceToken}")
            {
                Content = new StringContent(jsonPayload, Encoding.UTF8, "application/json")
            };
            request.Headers.Add("authorization", $"Bearer {jwtToken}");
            request.Headers.Add("apns-push-type", pushType);
            if (pushType == "liveactivity")
            {
                request.Headers.Add("apns-topic", _bundleId + ".push-type.liveactivity");
                request.Headers.Add("apns-priority", "10");
            }
            else
            {
                request.Headers.Add("apns-topic", _bundleId);
            }
            request.Version = new Version(2, 0);
            // Send the request
            var response = await _httpClient.SendAsync(request);
            if (response.IsSuccessStatusCode)
            {
                Console.WriteLine("Push notification sent successfully!");
            }
            else
            {
                var responseBody = await response.Content.ReadAsStringAsync();
                Console.WriteLine($"Failed to send push notification: {response.StatusCode} - {responseBody}");
            }
        }

    Sample Usage

    Here’s how you can use the ApnsService class to send a Live Activity notification:

    var apnsService = new ApnsService();
     // Example device token (replace with a real one)
     var pushDeviceToken = "808f63xxxxxxxxxxxxxxxxxxxxxxxxxxxxxxxxxxxxxxxxxxxxxxxxxxxxxxxxxxxxxx";
     // Create the payload for the Live Activity
     var notificationPayload = new PushNotification
     {
         Aps = new Aps
         {
             Timestamp = DateTimeOffset.UtcNow.ToUnixTimeSeconds(),
             Event = "update",
             ContentState = new ContentState
             {
                 Status = "Charging",
                 ChargeAmount = "65 Kw",
                 DollarAmount = "$11.80",
                 timeDuration = "00:28",
                 Percentage = 80
             },
         }
     };
     await apnsService.SendApnsNotificationAsync(pushDeviceToken, "liveactivity", notificationPayload);

    Key Points to Remember

    1. JWT Token Validity: Tokens expire after 1 hour. Ensure you regenerate tokens periodically.
    2. APNs Endpoint: Use the correct environment (production or development) based on your app stage.
    3. Error Handling: Handle HTTP responses carefully. Common issues include invalid tokens or expired certificates.

    Debugging Tips

    • Ensure your device token is correct and valid.
    • Double-check your .p8 file, Team ID, Key ID, and Bundle ID.
    • Use tools like Postman to test your APNs requests independently.

    Conclusion

    Sending Live Activity push notifications using .NET involves integrating APNs with proper authentication and payload setup. The ApnsService class demonstrated here provides a robust starting point for developers looking to enhance user engagement with real-time updates.🚀

    Mastering Feature Flag Management with Azure Feature Manager

    In the dynamic realm of software development, the power to adapt and refine your application’s features in real-time is a game-changer. Azure Feature Manager emerges as a potent tool in this scenario, empowering developers to effortlessly toggle features on or off directly from the cloud. This comprehensive guide delves into how Azure Feature Manager can revolutionize your feature flag control, enabling seamless feature introduction, rollback capabilities, A/B testing, and tailored user experiences.

    Introduction to Azure Feature Manager

    Azure Feature Manager is a sophisticated component of Azure App Configuration. It offers a unified platform for managing feature flags across various environments and applications. Its capabilities extend to gradual feature rollouts, audience targeting, and seamless integration with Azure Active Directory for enhanced access control.

    Step-by-Step Guide to Azure App Configuration Setup

    Initiating your journey with Azure Feature Manager begins with setting up an Azure App Configuration store. Follow these steps for a smooth setup:

    1. Create Your Azure App Configuration: Navigate to the Azure portal and initiate a new Azure App Configuration resource. Fill in the required details and proceed with creation.
    2. Secure Your Access Keys: Post-creation, access the “Access keys” section under your resource settings to retrieve the connection strings, crucial for your application’s connection to the Azure App Configuration.

    Crafting Feature Flags

    To leverage feature flags in your application:

    1. Within the Azure App Configuration resource, click on “Feature Manager” and then “+ Add” to introduce a new feature flag.
    2. Identify Your Feature Flag: Name it thoughtfully, as this identifier will be used within your application to assess the flag’s status

    Application Integration Essentials

    Installing Required NuGet Packages

    Your application necessitates specific packages for Azure integration:

    • Microsoft.Extensions.Configuration.AzureAppConfiguration
    • Microsoft.FeatureManagement.AspNetCore

    These can be added via your IDE or through the command line in your project directory:

    dotnet add package Microsoft.Extensions.Configuration.AzureAppConfiguration
    dotnet add package Microsoft.FeatureManagement.AspNetCore

    Application Configuration

    Modify your appsettings.json to include your Azure App Configuration connection string:

    {
      "ConnectionStrings": {
        "AppConfig": "Endpoint=https://<your-resource-name>.azconfig.io;Id=<id>;Secret=<secret>"
      }
    }

    Further, in Program.cs (or Startup.cs for earlier .NET versions), ensure your application is configured to utilize Azure App Configuration and activate feature management:

    var builder = WebApplication.CreateBuilder(args);
    
    builder.Configuration.AddAzureAppConfiguration(options =>
    {
        options.Connect(builder.Configuration["ConnectionStrings:AppConfig"])
               .UseFeatureFlags();
    });
    
    builder.Services.AddFeatureManagement();

    Implementing Feature Flags

    To verify a feature flag’s status within your code:

    using Microsoft.FeatureManagement;
    
    public class FeatureService
    {
        private readonly IFeatureManager _featureManager;
    
        public FeatureService(IFeatureManager featureManager)
        {
            _featureManager = featureManager;
        }
    
        public async Task<bool> IsFeatureActive(string featureName)
        {
            return await _featureManager.IsEnabledAsync(featureName);
        }
    }

    Advanced Implementation: Custom Targeting Filter

    Go to Azure and modify your feature flag

    Make sure the “Default Percentage” is set to 0 and in this scenario we want to target specific user based on its email address

    For user or group-specific targeting, We need to implement ITargetingContextAccessor. In below example we target based on its email address where the email address comes from JWT

    using Microsoft.FeatureManagement.FeatureFilters;
    using System.Security.Claims;
    
    namespace SampleApp
    {
        public class B2CTargetingContextAccessor : ITargetingContextAccessor
        {
            private const string TargetingContextLookup = "B2CTargetingContextAccessor.TargetingContext";
            private readonly IHttpContextAccessor _httpContextAccessor;
    
            public B2CTargetingContextAccessor(IHttpContextAccessor httpContextAccessor)
            {
                _httpContextAccessor = httpContextAccessor;
            }
    
            public ValueTask<TargetingContext> GetContextAsync()
            {
                HttpContext httpContext = _httpContextAccessor.HttpContext;
    
                //
                // Try cache lookup
                if (httpContext.Items.TryGetValue(TargetingContextLookup, out object value))
                {
                    return new ValueTask<TargetingContext>((TargetingContext)value);
                }
    
                ClaimsPrincipal user = httpContext.User;
    
                //
                // Build targeting context based off user info
                TargetingContext targetingContext = new TargetingContext
                {
                    UserId = user.FindFirst("http://schemas.xmlsoap.org/ws/2005/05/identity/claims/emailaddress")?.Value,
                    Groups = new string[] { }
                };
    
                //
                // Cache for subsequent lookup
                httpContext.Items[TargetingContextLookup] = targetingContext;
    
                return new ValueTask<TargetingContext>(targetingContext);
            }
        }
    }

    in Program.cs (or Startup.cs for earlier .NET versions), modify your Feature Management to use targeting filter

        builder.Services.AddFeatureManagement().WithTargeting<B2CTargetingContextAccessor>();

    You also need to pass the targeting context to the feature manager

    using Microsoft.FeatureManagement;
    
    public class FeatureService
    {
        private readonly IFeatureManager _featureManager;
        private readonly ITargetingContextAccessor _targetContextAccessor;
    
        public FeatureService(IFeatureManager featureManager, ITargetingContextAccessor targetingContextAccessor)
        {
            _featureManager = featureManager;
    _targetContextAccessor = targetingContextAccessor;
        }
    
        public async Task<bool> IsFeatureActive()
        {
            return await _featureManager.IsEnabledAsync("UseLocationWebhook", _targetContextAccessor);
        }
    }

    Simplifying API Testing in Postman: Auto-refresh OAuth Tokens with Pre-request Scripts

    Introduction:

    Welcome to a quick guide on enhancing your API testing workflow in Postman! If you frequently work with APIs that require OAuth tokens, you know the hassle of manually refreshing tokens. This blog post will show you how to automate this process using Pre-request scripts in Postman.

    What You Need:

    • Postman installed on your system.
    • API credentials (Client ID, Client Secret) for the OAuth token endpoint.

    Step 1: Setting Up Your Environment

    • Open Postman and select your workspace.
    • Go to the ‘Environments’ tab and create a new environment (e.g., “MyAPIEnvironment”).
    • Add variables like accessToken, clientId, clientSecret, and tokenUrl.

    Step 2: Creating the Pre-request Script

    • Go to the ‘Pre-request Scripts’ tab in your request or collection.
    • Add the following JavaScript code:
    if (!pm.environment.get('accessToken') || pm.environment.get('isTokenExpired')) {
        const getTokenRequest = {
            url: pm.environment.get('tokenUrl'),
            method: 'POST',
            header: 'Content-Type:application/x-www-form-urlencoded',
            body: {
                mode: 'urlencoded',
                urlencoded: [
                    { key: 'client_id', value: pm.environment.get('clientId') },
                    { key: 'client_secret', value: pm.environment.get('clientSecret') },
                    { key: 'grant_type', value: 'client_credentials' }
                ]
            }
        };
    
        pm.sendRequest(getTokenRequest, (err, res) => {
            if (err) {
                console.log(err);
            } else {
                const jsonResponse = res.json();
                pm.environment.set('accessToken', jsonResponse.access_token);
                pm.environment.set('isTokenExpired', false);
            }
        });
    }

    Step 3: Using the Access Token in Your Requests

    • In the ‘Authorization’ tab of your API request, select ‘Bearer Token’ as the type.
    • For the token, use the {{accessToken}} variable.

    Step 4: Testing and Verification

    • Send your API request.
    • The Pre-request script should automatically refresh the token if it’s not set or expired.
    • Check the Postman Console to debug or verify the token refresh process.

    Conclusion: Automating token refresh in Postman saves time and reduces the error-prone process of manual token updates. With this simple Pre-request script, your OAuth token management becomes seamless, letting you focus more on testing and less on token management.

    Further Reading:

    Page 1 of 18

    Powered by WordPress & Theme by Anders Norén